Text
How to Extract all Document Text
This script will take a document filename and generate a text file from all of its text.
The document can be any supported type.
The script works as a command line tool which expects the document filename supplied as a parameter. It generates one text file named “filename.txt” in the script directory. Text of pages is separated by a form feed character:
import sys, pathlib, pymupdf
fname = sys.argv[1]  # get document filename
with pymupdf.open(fname) as doc:  # open document
    text = chr(12).join([page.get_text() for page in doc])
# write as a binary file to support non-ASCII characters
pathlib.Path(fname + ".txt").write_bytes(text.encode())
The output will be plain text as it is coded in the document. No effort is made to prettify in any way. Specifically for PDF, this may mean output not in usual reading order, unexpected line breaks and so forth.
You have many options to rectify this – see chapter Appendix 2: Considerations on Embedded Files. Among them are:
Extract text in HTML format and store it as a HTML document, so it can be viewed in any browser.
Extract text as a list of text blocks via Page.get_text(“blocks”). Each item of this list contains position information for its text, which can be used to establish a convenient reading order.
Extract a list of single words via Page.get_text(“words”). Its items are words with position information. Use it to determine text contained in a given rectangle – see next section.
See the following two sections for examples and further explanations.
How to Extract Text as Markdown
This is especially useful for RAG/LLM environments - please see Outputting as Markdown.
How to Extract Key-Value Pairs from a Page
If the layout of a page is “predictable” in some sense, then there is a simple way to find the values for a given set of keywords fast and easily – without using regular expressions. Please see this example script.
“Predictable” in this context means:
Every keyword is followed by its value – no other text is present in between them.
The bottom of the value’s boundary box is not above the one of the keyword.
There are no other restrictions: the page layout may or may not be fixed, and the text may also have been stored as one string. Key and value may have any distance from each other.
For example, the following five key-value pairs will be correctly identified:
key1               value1
key2
value2
key3
       value3 blah, blah, blah key4 value4 some other text key5 value5 ...
How to Extract Text from within a Rectangle
There is now (v1.18.0) more than one way to achieve this. We therefore have created a folder in the PyMuPDF-Utilities repository specifically dealing with this topic.
How to Extract Text in Natural Reading Order
One of the common issues with PDF text extraction is, that text may not appear in any particular reading order.
This is the responsibility of the PDF creator (software or a human). For example, page headers may have been inserted in a separate step – after the document had been produced. In such a case, the header text will appear at the end of a page text extraction (although it will be correctly shown by PDF viewer software). For example, the following snippet will add some header and footer lines to an existing PDF:
doc = pymupdf.open("some.pdf")
header = "Header"  # text in header
for page in doc:
    page.insert_text((50, 50), header)  # insert header
    page.insert_text(  # insert footer 50 points above page bottom
        (50, page.rect.height - 50),
        f"Page {page.number + 1} of {doc.page_count}", # text in footer
    )
The text sequence extracted from a page modified in this way will look like this:
original text
header line
footer line
PyMuPDF has several means to re-establish some reading sequence or even to re-generate a layout close to the original:
Use
sortparameter ofPage.get_text(). It will sort the output from top-left to bottom-right (ignored for XHTML, HTML and XML output).Use the
pymupdfmodule in CLI:python -m pymupdf gettext ..., which produces a text file where text has been re-arranged in layout-preserving mode. Many options are available to control the output.
You can also use the above mentioned script with your modifications.
How to Extract Table Content from Documents
If you see a table in a document, you are normally not looking at something like an embedded Excel or other identifiable object. It usually is just normal, standard text, formatted to appear as tabular data.
Extracting tabular data from such a page area therefore means that you must find a way to identify the table area (i.e. its boundary box), then (1) graphically indicate table and column borders, and (2) then extract text based on this information.
This can be a very complex task, depending on details like the presence or absence of lines, rectangles or other supporting vector graphics.
Method Page.find_tables() does all that for you, with a high table detection precision. Its great advantage is that there are no external library dependencies, nor the need to employ artificial intelligence or machine learning technologies. It also provides an integrated interface to the well-known Python package for data analysis pandas.
Please have a look at example Jupyter notebooks, which cover standard situations like multiple tables on one page or joining table fragments across multiple pages.
How to Mark Extracted Text
There is a standard search function to search for arbitrary text on a page: Page.search_for(). It returns a list of Rect objects which surround a found occurrence. These rectangles can for example be used to automatically insert annotations which visibly mark the found text.
This method has advantages and drawbacks. Pros are:
The search string can contain blanks and wrap across lines
Upper or lower case characters are treated equal
Word hyphenation at line ends is detected and resolved
Return may also be a list of Quad objects to precisely locate text that is not parallel to either axis – using Quad output is also recommended, when page rotation is not zero.
But you also have other options:
import sys
import pymupdf

def mark_word(page, text):
    """Underline each word that contains 'text'.
    """
    found = 0
    wlist = page.get_text("words", delimiters=None)  # make the word list
    for w in wlist:  # scan through all words on page
        if text in w[4]:  # w[4] is the word's string
            found += 1  # count
            r = pymupdf.Rect(w[:4])  # make rect from word bbox
            page.add_underline_annot(r)  # underline
    return found

fname = sys.argv[1]  # filename
text = sys.argv[2]  # search string
doc = pymupdf.open(fname)

print(f"underlining words containing '{word}' in document '{doc.name}'")

new_doc = False  # indicator if anything found at all

for page in doc:  # scan through the pages
    found = mark_word(page, text)  # mark the page's words
    if found:  # if anything found ...
        new_doc = True
        print(f"found '{text}' {found} times on page {page.number + 1}")

if new_doc:
    doc.save("marked-" + doc.name)
This script uses Page.get_text("words") to look for a string, handed in via cli parameter. This method separates a page’s text into “words” using white spaces as delimiters. Further remarks:
If found, the complete word containing the string is marked (underlined) – not only the search string.
The search string may not contain word delimiters. By default, word delimiters are white spaces and the non-breaking space
chr(0xA0). If you use extra delimiting characters likepage.get_text("words", delimiters="./,")then none of these characters should be included in your search string either.As shown here, upper / lower cases are respected. But this can be changed by using the string method lower() (or even regular expressions) in function mark_word.
There is no upper limit: all occurrences will be detected.
You can use anything to mark the word: ‘Underline’, ‘Highlight’, ‘StrikeThrough’ or ‘Square’ annotations, etc.
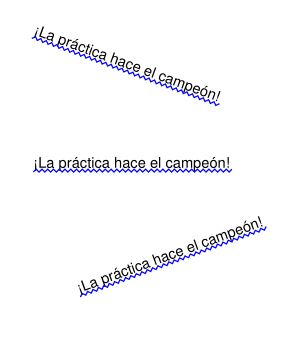
Here is an example snippet of a page of this manual, where “MuPDF” has been used as the search string. Note that all strings containing “MuPDF” have been completely underlined (not just the search string).
How to Mark Searched Text
This script searches for text and marks it:
# -*- coding: utf-8 -*-
import pymupdf

# the document to annotate
doc = pymupdf.open("tilted-text.pdf")

# the text to be marked
needle = "¡La práctica hace el campeón!"

# work with first page only
page = doc[0]

# get list of text locations
# we use "quads", not rectangles because text may be tilted!
rl = page.search_for(needle, quads=True)

# mark all found quads with one annotation
page.add_squiggly_annot(rl)

# save to a new PDF
doc.save("a-squiggly.pdf")
The result looks like this:
How to Mark Non-horizontal Text
The previous section already shows an example for marking non-horizontal text, that was detected by text searching.
But text extraction with the “dict” / “rawdict” options of Page.get_text() may also return text with a non-zero angle to the x-axis. This is indicated by the value of the line dictionary’s "dir" key: it is the tuple (cosine, sine) for that angle. If line["dir"] != (1, 0), then the text of all its spans is rotated by (the same) angle != 0.
The “bboxes” returned by the method however are rectangles only – not quads. So, to mark span text correctly, its quad must be recovered from the data contained in the line and span dictionary. Do this with the following utility function (new in v1.18.9):
span_quad = pymupdf.recover_quad(line["dir"], span)
annot = page.add_highlight_annot(span_quad)  # this will mark the complete span text
If you want to mark the complete line or a subset of its spans in one go, use the following snippet (works for v1.18.10 or later):
line_quad = pymupdf.recover_line_quad(line, spans=line["spans"][1:-1])
page.add_highlight_annot(line_quad)
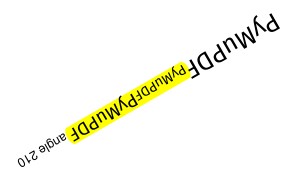
The spans argument above may specify any sub-list of line["spans"]. In the example above, the second to second-to-last span are marked. If omitted, the complete line is taken.
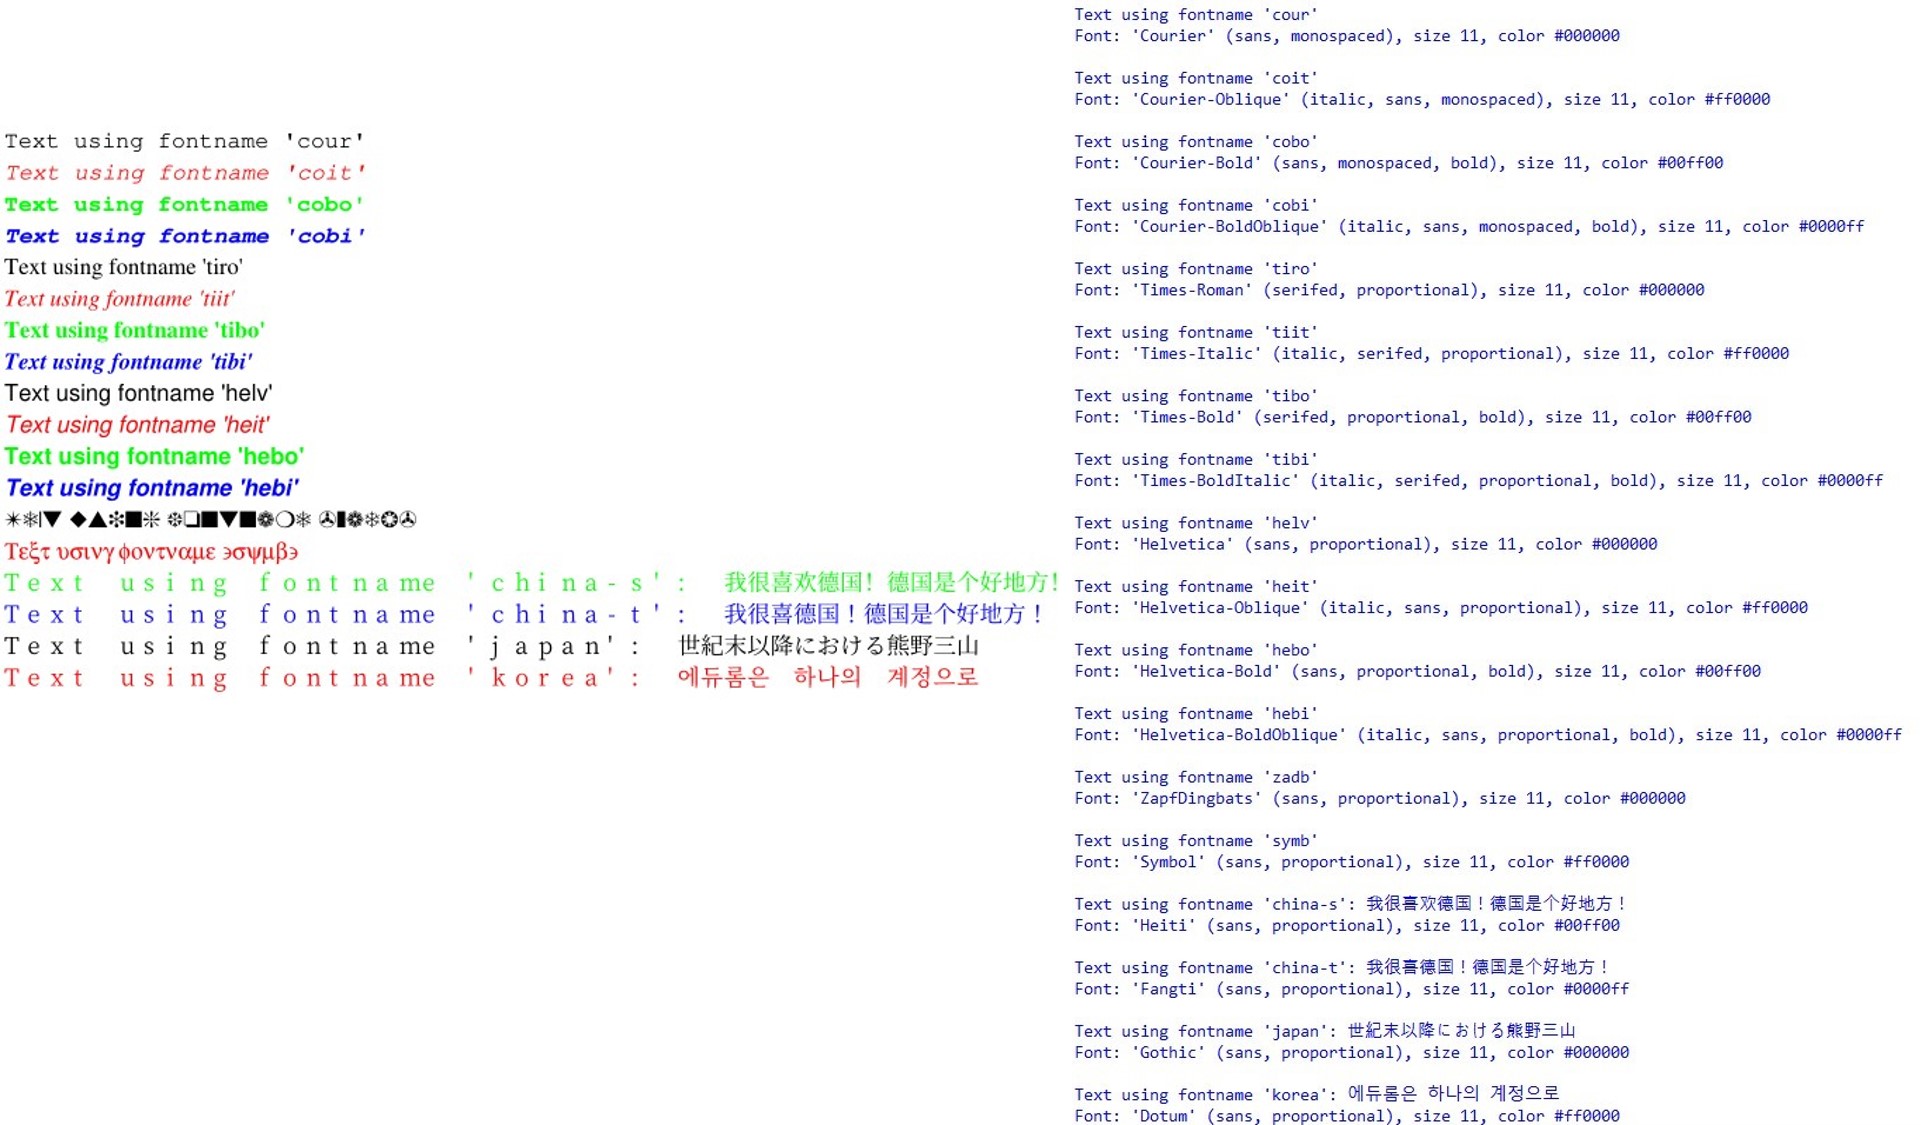
How to Analyze Font Characteristics
To analyze the characteristics of text in a PDF use this elementary script as a starting point:
import sys

import pymupdf


def flags_decomposer(flags):
    """Make font flags human readable."""
    l = []
    if flags & 2 ** 0:
        l.append("superscript")
    if flags & 2 ** 1:
        l.append("italic")
    if flags & 2 ** 2:
        l.append("serifed")
    else:
        l.append("sans")
    if flags & 2 ** 3:
        l.append("monospaced")
    else:
        l.append("proportional")
    if flags & 2 ** 4:
        l.append("bold")
    return ", ".join(l)


doc = pymupdf.open(sys.argv[1])
page = doc[0]

# read page text as a dictionary, suppressing extra spaces in CJK fonts
blocks = page.get_text("dict", flags=11)["blocks"]
for b in blocks:  # iterate through the text blocks
    for l in b["lines"]:  # iterate through the text lines
        for s in l["spans"]:  # iterate through the text spans
            print("")
            s_font = s['font']
            s_flags = flags_decomposer(s['flags'])
            s_size = s['size']
            s_color = s['color']
            print(f"Text: '{s['text']}'")  # simple print of text
            print(f"Font: '{s_font}' ({s_flags}), size {s_size}, color #{s_color:06x}")
Here is the PDF page and the script output:
How to Insert Text
PyMuPDF provides ways to insert text on new or existing PDF pages with the following features:
choose the font, including built-in fonts and fonts that are available as files
choose text characteristics like bold, italic, font size, font color, etc.
position the text in multiple ways:
either as simple line-oriented output starting at a certain point,
or fitting text in a box provided as a rectangle, in which case text alignment choices are also available,
choose whether text should be put in foreground (overlay existing content),
all text can be arbitrarily “morphed”, i.e. its appearance can be changed via a Matrix, to achieve effects like scaling, shearing or mirroring,
independently from morphing and in addition to that, text can be rotated by integer multiples of 90 degrees.
All of the above is provided by three basic Page, resp. Shape methods:
Page.insert_font()– install a font for the page for later reference. The result is reflected in the output ofDocument.get_page_fonts(). The font can be:provided as a file,
via Font (then use
Font.buffer)already present somewhere in this or another PDF, or
be a built-in font.
Page.insert_text()– write some lines of text. Internally, this usesShape.insert_text().Page.insert_textbox()– fit text in a given rectangle. Here you can choose text alignment features (left, right, centered, justified) and you keep control as to whether text actually fits. Internally, this usesShape.insert_textbox().
Note
Both text insertion methods automatically install the font as necessary.
How to Write Text Lines
Output some text lines on a page:
import pymupdf
doc = pymupdf.open(...)  # new or existing PDF
page = doc.new_page()  # new or existing page via doc[n]
p = pymupdf.Point(50, 72)  # start point of 1st line

text = "Some text,\nspread across\nseveral lines."
# the same result is achievable by
# text = ["Some text", "spread across", "several lines."]

rc = page.insert_text(p,  # bottom-left of 1st char
                     text,  # the text (honors '\n')
                     fontname = "helv",  # the default font
                     fontsize = 11,  # the default font size
                     rotate = 0,  # also available: 90, 180, 270
                     )
print(f"{rc} lines printed on page {page.number}.")

doc.save("text.pdf")
With this method, only the number of lines will be controlled to not go beyond page height. Surplus lines will not be written and the number of actual lines will be returned. The calculation uses a line height calculated from the fontsize and 36 points (0.5 inches) as bottom margin.
Line width is ignored. The surplus part of a line will simply be invisible.
However, for built-in fonts there are ways to calculate the line width beforehand - see get_text_length().
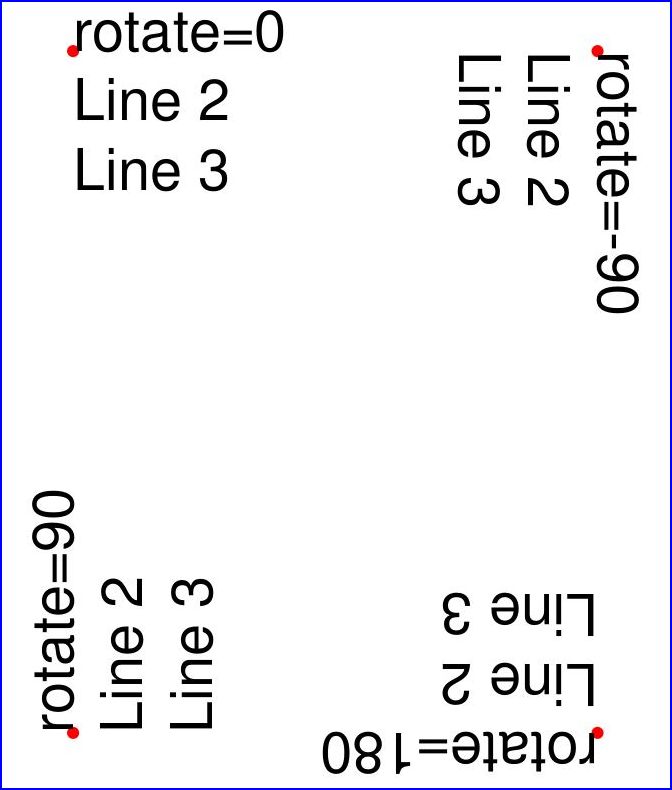
Here is another example. It inserts 4 text strings using the four different rotation options, and thereby explains, how the text insertion point must be chosen to achieve the desired result:
import pymupdf
doc = pymupdf.open()
page = doc.new_page()
# the text strings, each having 3 lines
text1 = "rotate=0\nLine 2\nLine 3"
text2 = "rotate=90\nLine 2\nLine 3"
text3 = "rotate=-90\nLine 2\nLine 3"
text4 = "rotate=180\nLine 2\nLine 3"
red = (1, 0, 0) # the color for the red dots
# the insertion points, each with a 25 pix distance from the corners
p1 = pymupdf.Point(25, 25)
p2 = pymupdf.Point(page.rect.width - 25, 25)
p3 = pymupdf.Point(25, page.rect.height - 25)
p4 = pymupdf.Point(page.rect.width - 25, page.rect.height - 25)
# create a Shape to draw on
shape = page.new_shape()

# draw the insertion points as red, filled dots
shape.draw_circle(p1,1)
shape.draw_circle(p2,1)
shape.draw_circle(p3,1)
shape.draw_circle(p4,1)
shape.finish(width=0.3, color=red, fill=red)

# insert the text strings
shape.insert_text(p1, text1)
shape.insert_text(p3, text2, rotate=90)
shape.insert_text(p2, text3, rotate=-90)
shape.insert_text(p4, text4, rotate=180)

# store our work to the page
shape.commit()
doc.save(...)
This is the result:
How to Fill a Text Box
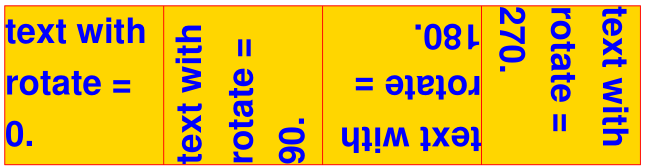
This script fills 4 different rectangles with text, each time choosing a different rotation value:
import pymupdf

doc = pymupdf.open()  # new or existing PDF
page = doc.new_page()  # new page, or choose doc[n]

# write in this overall area
rect = pymupdf.Rect(100, 100, 300, 150)

# partition the area in 4 equal sub-rectangles
CELLS = pymupdf.make_table(rect, cols=4, rows=1)

t1 = "text with rotate = 0."  # these texts we will written
t2 = "text with rotate = 90."
t3 = "text with rotate = 180."
t4 = "text with rotate = 270."
text = [t1, t2, t3, t4]
red = pymupdf.pdfcolor["red"]  # some colors
gold = pymupdf.pdfcolor["gold"]
blue = pymupdf.pdfcolor["blue"]
"""
We use a Shape object (something like a canvas) to output the text and
the rectangles surrounding it for demonstration.
"""
shape = page.new_shape()  # create Shape
for i in range(len(CELLS[0])):
    shape.draw_rect(CELLS[0][i])  # draw rectangle
    shape.insert_textbox(
        CELLS[0][i], text[i], fontname="hebo", color=blue, rotate=90 * i
    )

shape.finish(width=0.3, color=red, fill=gold)

shape.commit()  # write all stuff to the page
doc.ez_save(__file__.replace(".py", ".pdf"))
Some default values were used above: font size 11 and text alignment “left”. The result will look like this:
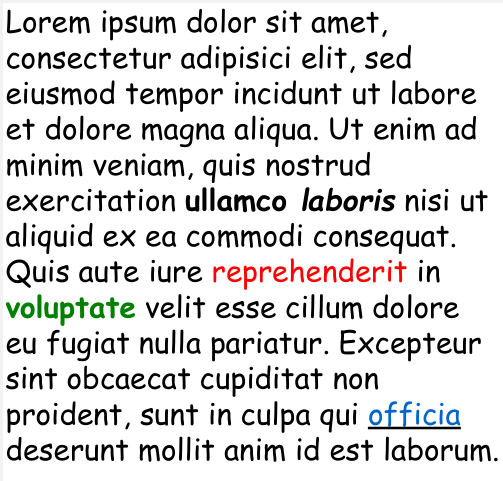
How to Fill a Box with HTML Text
Method Page.insert_htmlbox() offers a much more powerful way to insert text in a rectangle.
Instead of simple, plain text, this method accepts HTML source, which may not only contain HTML tags but also styling instructions to influence things like font, font weight (bold) and style (italic), color and much more.
It is also possible to mix multiple fonts and languages, to output HTML tables and to insert images and URI links.
For even more styling flexibility, an additional CSS source may also be given.
The method is based on the Story class. Therefore, complex script systems like Devanagari, Nepali, Tamil and many are supported and written correctly thanks to using the HarfBuzz library - which provides this so-called “text shaping” feature.
Any required fonts to output characters are automatically pulled in from the Google NOTO font library - as a fallback (when the – optionally supplied – user font(s) do not contain some glyphs).
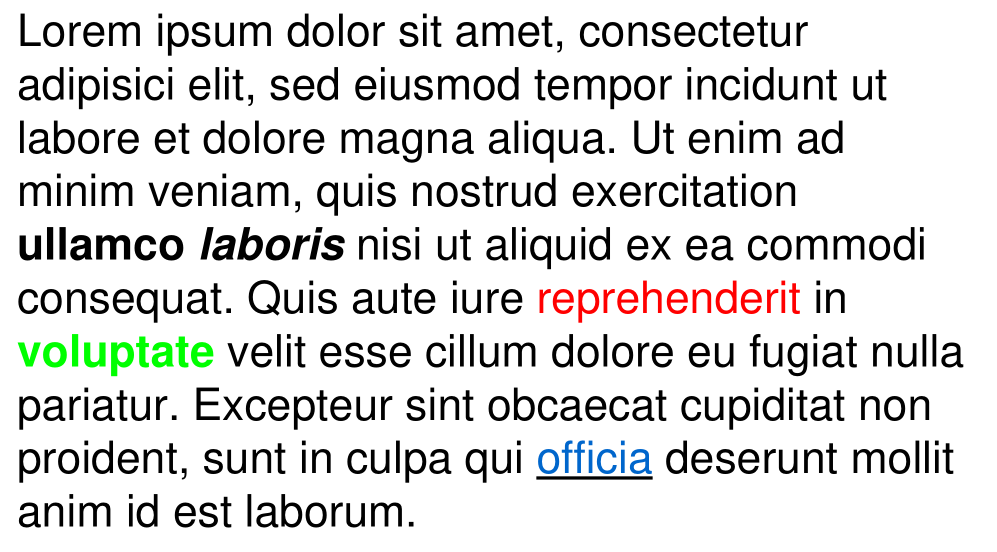
As a small glimpse into the features offered here, we will output the following HTML-enriched text:
import pymupdf


rect = pymupdf.Rect(100, 100, 400, 300)

text = """Lorem ipsum dolor sit amet, consectetur adipisici elit, sed
    eiusmod tempor incidunt ut labore et dolore magna aliqua. Ut enim ad
    minim veniam, quis nostrud exercitation <b>ullamco <i>laboris</i></b>
    nisi ut aliquid ex ea commodi consequat. Quis aute iure
    <span style="color: #f00;">reprehenderit</span>
    in <span style="color: #0f0;font-weight:bold;">voluptate</span> velit
    esse cillum dolore eu fugiat nulla pariatur. Excepteur sint obcaecat
    cupiditat non proident, sunt in culpa qui
    <a href="https://www.artifex.com">officia</a> deserunt mollit anim id
    est laborum."""

doc = pymupdf.Document()

page = doc.new_page()
page.insert_htmlbox(rect, text, css="* {font-family: sans-serif;font-size:14px;}")

doc.ez_save(__file__.replace(".py", ".pdf"))
Please note how the “css” parameter is used to globally select the default “sans-serif” font and a font size of 14.
The result will look like this:
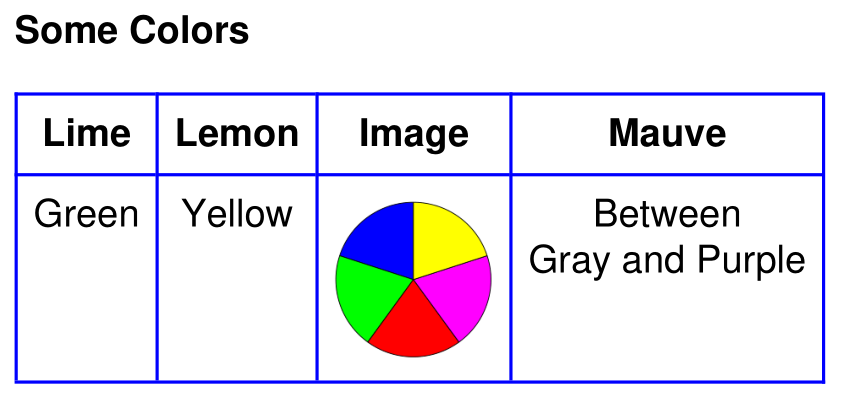
How to output HTML tables and images
Here is another example that outputs a table with this method. This time, we are including all the styling in the HTML source itself. Please also note, how it works to include an image - even within a table cell:
import pymupdf
import os

filedir = os.path.dirname(__file__)


text = """
<style>
body {
    font-family: sans-serif;
}

td,
th {
    border: 1px solid blue;
    border-right: none;
    border-bottom: none;
    padding: 5px;
    text-align: center;
}

table {
    border-right: 1px solid blue;
    border-bottom: 1px solid blue;
    border-spacing: 0;
}
</style>

<body>
<p><b>Some Colors</b></p>
<table>
    <tr>
    <th>Lime</th>
    <th>Lemon</th>
    <th>Image</th>
    <th>Mauve</th>
    </tr>
    <tr>
    <td>Green</td>
    <td>Yellow</td>
    <td><img src="img-cake.png" width=50></td>
    <td>Between<br>Gray and Purple</td>
    </tr>
</table>
</body>
"""

doc = pymupdf.Document()

page = doc.new_page()
rect = page.rect + (36, 36, -36, -36)

# we must specify an Archive because of the image
page.insert_htmlbox(rect, text, archive=pymupdf.Archive("."))

doc.ez_save(__file__.replace(".py", ".pdf"))
The result will look like this:
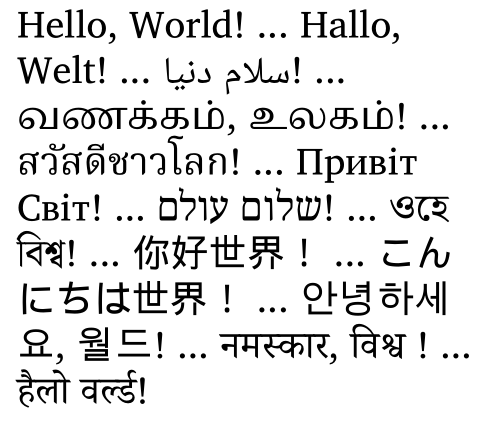
How to Output Languages of the World
Our third example will demonstrate the automatic multi-language support. It includes automatic text shaping for complex scripting systems like Devanagari and right-to-left languages:
import pymupdf

greetings = (
    "Hello, World!",  # english
    "Hallo, Welt!",  # german
    "سلام دنیا!",  # persian
    "வணக்கம், உலகம்!",  # tamil
    "สวัสดีชาวโลก!",  # thai
    "Привіт Світ!",  # ucranian
    "שלום עולם!",  # hebrew
    "ওহে বিশ্ব!",  # bengali
    "你好世界!",  # chinese
    "こんにちは世界!",  # japanese
    "안녕하세요, 월드!",  # korean
    "नमस्कार, विश्व !",  # sanskrit
    "हैलो वर्ल्ड!",  # hindi
)
doc = pymupdf.open()
page = doc.new_page()
rect = (50, 50, 200, 500)

# join greetings into one text string
text = " ... ".join([t for t in greetings])

# the output of the above is simple:
page.insert_htmlbox(rect, text)
doc.save(__file__.replace(".py", ".pdf"))
And this is the output:
How to Specify your Own Fonts
Define your font files in CSS syntax using the @font-face statement. You need a separate @font-face for every combination of font weight and font style (e.g. bold or italic) you want to be supported. The following example uses the famous MS Comic Sans font in its four variants regular, bold, italic and bold-italic.
As these four font files are located in the system’s folder C:/Windows/Fonts the method needs an Archive definition that points to that folder:
"""
How to use your own fonts with method Page.insert_htmlbox().
"""
import pymupdf

# Example text
text = """Lorem ipsum dolor sit amet, consectetur adipisici elit, sed
    eiusmod tempor incidunt ut labore et dolore magna aliqua. Ut enim ad
    minim veniam, quis nostrud exercitation <b>ullamco <i>laboris</i></b>
    nisi ut aliquid ex ea commodi consequat. Quis aute iure
    <span style="color: red;">reprehenderit</span>
    in <span style="color: green;font-weight:bold;">voluptate</span> velit
    esse cillum dolore eu fugiat nulla pariatur. Excepteur sint obcaecat
    cupiditat non proident, sunt in culpa qui
    <a href="https://www.artifex.com">officia</a> deserunt mollit anim id
    est laborum."""

"""
We need an Archive object to show where font files are located.
We intend to use the font family "MS Comic Sans".
"""
arch = pymupdf.Archive("C:/Windows/Fonts")

# These statements define which font file to use for regular, bold,
# italic and bold-italic text.
# We assign an arbitrary common font-family for all 4 font files.
# The Story algorithm will select the right file as required.
# We request to use "comic" throughout the text.
css = """
@font-face {font-family: comic; src: url(comic.ttf);}
@font-face {font-family: comic; src: url(comicbd.ttf);font-weight: bold;}
@font-face {font-family: comic; src: url(comicz.ttf);font-weight: bold;font-style: italic;}
@font-face {font-family: comic; src: url(comici.ttf);font-style: italic;}
* {font-family: comic;}
"""

doc = pymupdf.Document()
page = doc.new_page(width=150, height=150)  # make small page

page.insert_htmlbox(page.rect, text, css=css, archive=arch)

doc.subset_fonts(verbose=True)  # build subset fonts to reduce file size
doc.ez_save(__file__.replace(".py", ".pdf"))
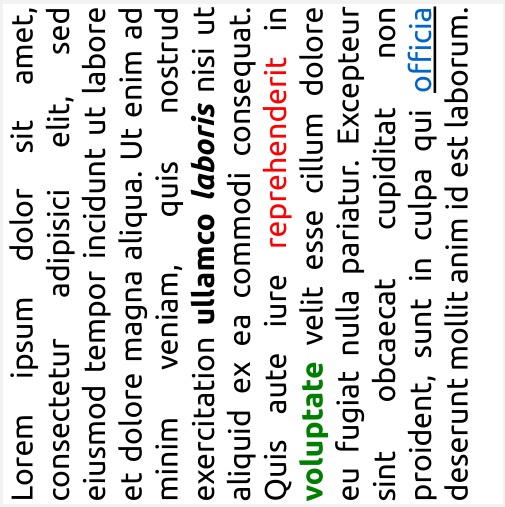
How to Request Text Alignment
This example combines multiple requirements:
Rotate the text by 90 degrees anti-clockwise.
Use a font from package pymupdf-fonts. You will see that the respective CSS definitions are a lot easier in this case.
Align the text with the “justify” option.
"""
How to use a pymupdf font with method Page.insert_htmlbox().
"""
import pymupdf

# Example text
text = """Lorem ipsum dolor sit amet, consectetur adipisici elit, sed
    eiusmod tempor incidunt ut labore et dolore magna aliqua. Ut enim ad
    minim veniam, quis nostrud exercitation <b>ullamco <i>laboris</i></b>
    nisi ut aliquid ex ea commodi consequat. Quis aute iure
    <span style="color: red;">reprehenderit</span>
    in <span style="color: green;font-weight:bold;">voluptate</span> velit
    esse cillum dolore eu fugiat nulla pariatur. Excepteur sint obcaecat
    cupiditat non proident, sunt in culpa qui
    <a href="https://www.artifex.com">officia</a> deserunt mollit anim id
    est laborum."""

"""
This is similar to font file support. However, we can use a convenience
function for creating required CSS definitions.
We still need an Archive for finding the font binaries.
"""
arch = pymupdf.Archive()

# We request to use "myfont" throughout the text.
css = pymupdf.css_for_pymupdf_font("ubuntu", archive=arch, name="myfont")
css += "* {font-family: myfont;text-align: justify;}"

doc = pymupdf.Document()

page = doc.new_page(width=150, height=150)

page.insert_htmlbox(page.rect, text, css=css, archive=arch, rotate=90)

doc.subset_fonts(verbose=True)
doc.ez_save(__file__.replace(".py", ".pdf"))
How to Extract Text with Color
Iterate through your text blocks and find the spans of text you need for this information.
for page in doc:
    text_blocks = page.get_text("dict", flags=pymupdf.TEXTFLAGS_TEXT)["blocks"]
    for block in text_blocks:
        for line in block["lines"]:
            for span in line["spans"]:
                text = span["text"]
                color = pymupdf.sRGB_to_rgb(span["color"])
                print(f"Text: {text}, Color: {color}")