기초
파일 열기
파일을 열려면 다음을 수행합니다:
import pymupdf

doc = pymupdf.open("a.pdf") # open a document
PDF 에서 텍스트 추출
PDF 파일에서 모든 텍스트를 추출하려면 다음을 수행합니다:
import pymupdf

doc = pymupdf.open("a.pdf") # open a document
out = open("output.txt", "wb") # create a text output
for page in doc: # iterate the document pages
    text = page.get_text().encode("utf8") # get plain text (is in UTF-8)
    out.write(text) # write text of page
    out.write(bytes((12,))) # write page delimiter (form feed 0x0C)
out.close()
물론 텍스트를 추출할 수 있는 것은 PDF 만이 아닙니다 - 지원되는 문서 파일 형식 (예: MOBI, EPUB, TXT) 모두에서 텍스트를 추출할 수 있습니다.
참고
더 알아보기
문서에 이미지 기반 텍스트 콘텐츠가 포함된 경우 후속 텍스트 추출을 위해 페이지에서 OCR을 사용합니다:
tp = page.get_textpage_ocr()
text = page.get_text(textpage=tp)
특정 영역에서 텍스트를 추출하거나 문서에서 테이블을 추출하는 방법을 설명하는 더 많은 예제가 있습니다. 텍스트 가이드 를 참조하세요.
이제 Markdown 형식으로 텍스트 추출 도 할 수 있습니다.
API 참조
PDF 에서 이미지 추출
PDF 파일에서 모든 이미지를 추출하려면 다음을 수행합니다:
import pymupdf

doc = pymupdf.open("test.pdf") # open a document

for page_index in range(len(doc)): # iterate over pdf pages
    page = doc[page_index] # get the page
    image_list = page.get_images()

    # print the number of images found on the page
    if image_list:
        print(f"Found {len(image_list)} images on page {page_index}")
    else:
        print("No images found on page", page_index)

    for image_index, img in enumerate(image_list, start=1): # enumerate the image list
        xref = img[0] # get the XREF of the image
        pix = pymupdf.Pixmap(doc, xref) # create a Pixmap

        if pix.n - pix.alpha > 3: # CMYK: convert to RGB first
            pix = pymupdf.Pixmap(pymupdf.csRGB, pix)

        pix.save(f"page_{page_index}-image_{image_index}.png") # save the image as png
        pix = None
벡터 그래픽 추출
문서 페이지에서 모든 벡터 그래픽을 추출하려면 다음을 수행합니다:
doc = pymupdf.open("some.file")
page = doc[0]
paths = page.get_drawings()
이것은 페이지에서 발견된 모든 벡터 그림에 대한 경로 딕셔너리를 반환합니다.
PDF 파일 병합
PDF 파일을 병합하려면 다음을 수행합니다:
import pymupdf

doc_a = pymupdf.open("a.pdf") # open the 1st document
doc_b = pymupdf.open("b.pdf") # open the 2nd document

doc_a.insert_pdf(doc_b) # merge the docs
doc_a.save("a+b.pdf") # save the merged document with a new filename
다른 타입의 파일과 PDF 파일 병합
Document.insert_file() 메서드를 사용하여 지원되는 파일 을 PDF 와 병합할 수 있습니다. 예:
import pymupdf

doc_a = pymupdf.open("a.pdf") # open the 1st document
doc_b = pymupdf.open("b.svg") # open the 2nd document

doc_a.insert_file(doc_b) # merge the docs
doc_a.save("a+b.pdf") # save the merged document with a new filename
참고
더 알아보기
Document.insert_pdf() 및 Document.insert_file() 로 PDF를 쉽게 결합할 수 있습니다. 열린 PDF 문서가 주어지면 한 문서에서 다른 문서로 페이지 범위를 복사할 수 있습니다. 복사된 페이지가 배치될 지점을 선택하고, 페이지 순서를 되돌리고, 페이지 회전을 변경할 수도 있습니다.
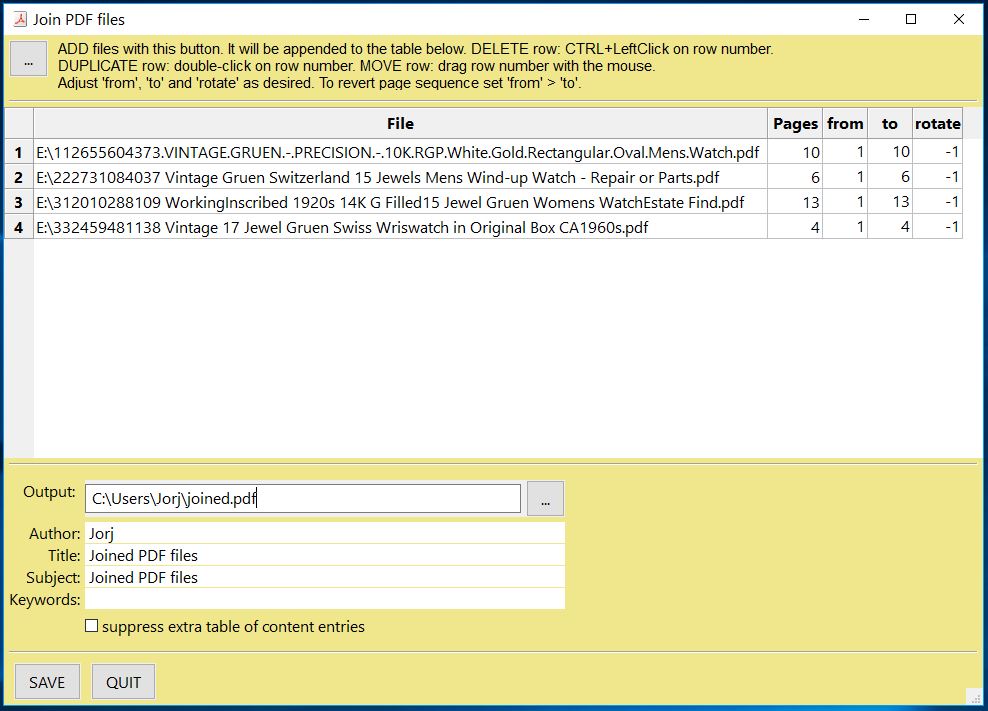
GUI 스크립트 join.py 는 이 메서드를 사용하여 파일 목록을 결합하면서 각 목차 세그먼트도 결합합니다. 다음과 같습니다:
API 참조
좌표 작업
PyMuPDF 를 사용할 때 익숙해야 할 수학 용어 가 하나 있습니다 - “좌표” 입니다. 객체를 배치하고 문서 공간을 이해하는 데 도움이 되도록 좌표계를 이해하기 위해 좌표 섹션을 빠르게 살펴보세요.
PDF 에 워터마크 추가
PDF 파일에 워터마크를 추가하려면 다음을 수행합니다:
import pymupdf

doc = pymupdf.open("document.pdf") # open a document

for page_index in range(len(doc)): # iterate over pdf pages
    page = doc[page_index] # get the page

    # insert an image watermark from a file name to fit the page bounds
    page.insert_image(page.bound(),filename="watermark.png", overlay=False)

doc.save("watermarked-document.pdf") # save the document with a new filename
참고
더 알아보기
워터마크 추가는 기본적으로 각 PDF 페이지 하단에 이미지를 추가하는 것만큼 간단합니다. 필요한 불투명도와 종횡비를 갖도록 이미지를 확인해야 합니다.
위 예제에서는 각 파일 참조에서 새 이미지가 생성되지만, 더 성능을 높이려면(메모리와 파일 크기를 절약하기 위해) 이 이미지 데이터는 한 번만 참조해야 합니다 - 구현에 대한 코드 예제 및 설명은 Page.insert_image() 를 참조하세요.
API 참조
PDF 에 이미지 추가
PDF 파일에 이미지(예: 로고)를 추가하려면 다음을 수행합니다:
import pymupdf

doc = pymupdf.open("document.pdf") # open a document

for page_index in range(len(doc)): # iterate over pdf pages
    page = doc[page_index] # get the page

    # insert an image logo from a file name at the top left of the document
    page.insert_image(pymupdf.Rect(0,0,50,50),filename="my-logo.png")

doc.save("logo-document.pdf") # save the document with a new filename
참고
더 알아보기
워터마크 예제와 마찬가지로 가능한 경우 이미지를 한 번만 참조하여 성능을 높이도록 해야 합니다 - 코드 예제 및 설명은 Page.insert_image() 를 참조하세요.
API 참조
PDF 회전
페이지에 회전을 추가하려면 다음을 수행합니다:
import pymupdf

doc = pymupdf.open("test.pdf") # open document
page = doc[0] # get the 1st page of the document
page.set_rotation(90) # rotate the page
doc.save("rotated-page-1.pdf")
PDF 자르기
페이지를 정의된 Rect 로 자르려면 다음을 수행합니다:
import pymupdf

doc = pymupdf.open("test.pdf") # open document
page = doc[0] # get the 1st page of the document
page.set_cropbox(pymupdf.Rect(100, 100, 400, 400)) # set a cropbox for the page
doc.save("cropped-page-1.pdf")
파일 첨부
페이지에 다른 파일을 첨부하려면 다음을 수행합니다:
import pymupdf

doc = pymupdf.open("test.pdf") # open main document
attachment = pymupdf.open("my-attachment.pdf") # open document you want to attach

page = doc[0] # get the 1st page of the document
point = pymupdf.Point(100, 100) # create the point where you want to add the attachment
attachment_data = attachment.tobytes() # get the document byte data as a buffer

# add the file annotation with the point, data and the file name
file_annotation = page.add_file_annot(point, attachment_data, "attachment.pdf")

doc.save("document-with-attachment.pdf") # save the document
참고
더 알아보기
Page.add_file_annot() 로 파일을 추가할 때 filename 의 세 번째 매개변수에는 실제 파일 확장자가 포함되어야 합니다. 이것이 없으면 첨부 파일이 열 수 있는 것으로 인식되지 않을 수 있습니다. 예를 들어, filename 이 단순히 “attachment” 인 경우 결과 PDF를 보고 첨부 파일을 열려고 하면 오류가 발생할 수 있습니다. 그러나 “attachment.pdf” 인 경우 PDF 뷰어에서 유효한 파일 타입으로 인식하고 열 수 있습니다.
첨부 파일의 기본 아이콘은 기본적으로 “push pin” 이지만, icon 매개변수를 설정하여 변경할 수 있습니다.
API 참조
파일 임베드
문서에 파일을 임베드하려면 다음을 수행합니다:
import pymupdf

doc = pymupdf.open("test.pdf") # open main document
embedded_doc = pymupdf.open("my-embed.pdf") # open document you want to embed

embedded_data = embedded_doc.tobytes() # get the document byte data as a buffer

# embed with the file name and the data
doc.embfile_add("my-embedded_file.pdf", embedded_data)

doc.save("document-with-embed.pdf") # save the document
참고
더 알아보기
파일 첨부 와 마찬가지로 Document.embfile_add() 로 파일을 추가할 때 filename 의 첫 번째 매개변수에는 실제 파일 확장자가 포함되어야 합니다.
API 참조
페이지 삭제
문서에서 페이지를 삭제하려면 다음을 수행합니다:
import pymupdf

doc = pymupdf.open("test.pdf") # open a document
doc.delete_page(0) # delete the 1st page of the document
doc.save("test-deleted-page-one.pdf") # save the document
문서에서 여러 페이지를 삭제하려면 다음을 수행합니다:
import pymupdf

doc = pymupdf.open("test.pdf") # open a document
doc.delete_pages(from_page=9, to_page=14) # delete a page range from the document
doc.save("test-deleted-pages.pdf") # save the document
책갈피나 하이퍼링크가 참조하는 페이지를 삭제하면 어떻게 되나요?
책갈피(목차 항목)는 비활성화되어 더 이상 어떤 페이지로도 이동하지 않습니다.
하이퍼링크는 포함된 페이지에서 제거됩니다. 해당 페이지의 표시된 콘텐츠는 다른 방식으로 변경되지 않습니다.
참고
더 알아보기
페이지 인덱스는 0 기반이므로 문서의 10페이지를 삭제하려면 doc.delete_page(9) 를 수행합니다.
마찬가지로 doc.delete_pages(from_page=9, to_page=14) 는 10-15페이지를 포함하여 삭제합니다.
API 참조
페이지 재배열
페이지 순서를 변경하려면(즉, 페이지를 재배열하려면) 다음을 수행합니다:
import pymupdf

doc = pymupdf.open("test.pdf") # open a document
doc.move_page(1,0) # move the 2nd page of the document to the start of the document
doc.save("test-page-moved.pdf") # save the document
페이지 복사
페이지를 복사하려면 다음을 수행합니다:
import pymupdf

doc = pymupdf.open("test.pdf") # open a document
doc.copy_page(0) # copy the 1st page and puts it at the end of the document
doc.save("test-page-copied.pdf") # save the document
페이지 선택
페이지를 선택하려면 다음을 수행합니다:
import pymupdf

doc = pymupdf.open("test.pdf") # open a document
doc.select([0, 1]) # select the 1st & 2nd page of the document
doc.save("just-page-one-and-two.pdf") # save the document
참고
더 알아보기
PyMuPDF 를 사용하면 PDF 의 페이지를 복사, 이동, 삭제 또는 재배열할 수 있는 모든 옵션이 있습니다. Document.copy_page() 메서드와 같이 페이지별로 수행할 수 있는 직관적인 메서드가 있습니다.
또는 원하는 페이지 번호를 원하는 순서로, 각 페이지를 원하는 횟수만큼 포함하는 Python 시퀀스 형식으로 완전히 새로운 페이지 레이아웃을 준비할 수도 있습니다. 다음은 Document.select() 로 수행할 수 있는 작업을 보여줍니다
doc.select([1, 1, 1, 5, 4, 9, 9, 9, 0, 2, 2, 2])
이제 양면 인쇄를 위한 PDF를 준비하겠습니다(이를 직접 지원하지 않는 프린터에서):
페이지 수는 len(doc) (또는 doc.page_count 와 동일)로 제공됩니다. 다음 목록은 각각 짝수 및 홀수 페이지 번호를 나타냅니다:
p_even = [p in range(doc.page_count) if p % 2 == 0]
p_odd  = [p in range(doc.page_count) if p % 2 == 1]
이 코드 조각은 문서를 인쇄하는 데 사용할 수 있는 각 하위 문서를 생성합니다:
doc.select(p_even) # only the even pages left over
doc.save("even.pdf") # save the "even" PDF
doc.close() # recycle the file
doc = pymupdf.open(doc.name) # re-open
doc.select(p_odd) # and do the same with the odd pages
doc.save("odd.pdf")
자세한 내용은 이 Wiki 문서 도 참조하세요.
다음 예제는 모든 페이지의 순서를 반대로 합니다(매우 빠름: Adobe PDF 참조 의 756페이지에 대해 1초 미만):
lastPage = doc.page_count - 1
for i in range(lastPage):
    doc.move_page(lastPage, i) # move current last page to the front
이 코드 조각은 PDF를 자체와 중복시켜 0, 1, …, n, 0, 1, …, n 페이지를 포함하도록 합니다**(매우 빠르고 파일 크기가 눈에 띄게 증가하지 않음!)**
page_count = len(doc)
for i in range(page_count):
    doc.copy_page(i) # copy this page to after last page
API 참조
빈 페이지 추가
빈 페이지를 추가하려면 다음을 수행합니다:
import pymupdf

doc = pymupdf.open(...) # some new or existing PDF document
page = doc.new_page(-1, # insertion point: end of document
                    width = 595, # page dimension: A4 portrait
                    height = 842)
doc.save("doc-with-new-blank-page.pdf") # save the document
참고
더 알아보기
다른 사전 정의된 용지 형식으로 페이지를 만들려면 다음을 사용합니다:
w, h = pymupdf.paper_size("letter-l")  # 'Letter' landscape
page = doc.new_page(width = w, height = h)
편의 함수 paper_size() 는 선택할 수 있는 40개 이상의 산업 표준 용지 형식을 알고 있습니다. 이를 보려면 딕셔너리 paperSizes 를 검사하세요. 원하는 딕셔너리 키를 paper_size() 에 전달하여 용지 크기를 검색합니다. 대소문자가 지원됩니다. 형식 이름에 “-L” 을 추가하면 가로 방향 버전이 반환됩니다.
다음은 빈 페이지 하나가 있는 PDF 를 생성하는 3줄 코드입니다. 파일 크기는 460바이트입니다:
doc = pymupdf.open()
doc.new_page()
doc.save("A4.pdf")
API 참조
paperSizes
텍스트 콘텐츠가 있는 페이지 삽입
Document.insert_page() 메서드를 사용하면 새 페이지도 삽입되고 동일한 width 및 height 매개변수를 허용합니다. 하지만 새 페이지에 임의의 텍스트를 삽입할 수 있으며 삽입된 줄 수를 반환합니다.
import pymupdf

doc = pymupdf.open(...)  # some new or existing PDF document
n = doc.insert_page(-1, # default insertion point
                    text = "The quick brown fox jumped over the lazy dog",
                    fontsize = 11,
                    width = 595,
                    height = 842,
                    fontname = "Helvetica", # default font
                    fontfile = None, # any font file name
                    color = (0, 0, 0)) # text color (RGB)
참고
더 알아보기
텍스트 매개변수는 문자열(또는 문자열 시퀀스)일 수 있습니다(UTF-8 인코딩 가정). 삽입은 Point (50, 72)에서 시작되며, 이는 페이지 상단에서 1인치 아래, 왼쪽에서 50포인트입니다. 삽입된 텍스트 줄 수가 반환됩니다.
API 참조
단일 페이지 분할
이것은 PDF 의 페이지를 임의의 조각으로 분할하는 것을 다룹니다. 예를 들어, 4배 확대 인쇄하려는 Letter 형식 페이지가 있는 PDF 가 있을 수 있습니다: 각 페이지는 4개 조각으로 분할되며, 각 조각은 다시 Letter 형식의 별도 PDF 페이지로 이동합니다.
import pymupdf

src = pymupdf.open("test.pdf")
doc = pymupdf.open()  # empty output PDF

for spage in src:  # for each page in input
    r = spage.rect  # input page rectangle
    d = pymupdf.Rect(spage.cropbox_position,  # CropBox displacement if not
                  spage.cropbox_position)  # starting at (0, 0)
    #--------------------------------------------------------------------------
    # example: cut input page into 2 x 2 parts
    #--------------------------------------------------------------------------
    r1 = r / 2  # top left rect
    r2 = r1 + (r1.width, 0, r1.width, 0)  # top right rect
    r3 = r1 + (0, r1.height, 0, r1.height)  # bottom left rect
    r4 = pymupdf.Rect(r1.br, r.br)  # bottom right rect
    rect_list = [r1, r2, r3, r4]  # put them in a list

    for rx in rect_list:  # run thru rect list
        rx += d  # add the CropBox displacement
        page = doc.new_page(-1,  # new output page with rx dimensions
                           width = rx.width,
                           height = rx.height)
        page.show_pdf_page(
                page.rect,  # fill all new page with the image
                src,  # input document
                spage.number,  # input page number
                clip = rx,  # which part to use of input page
            )

# that's it, save output file
doc.save("poster-" + src.name,
         garbage=3,  # eliminate duplicate objects
         deflate=True,  # compress stuff where possible
)
예제:

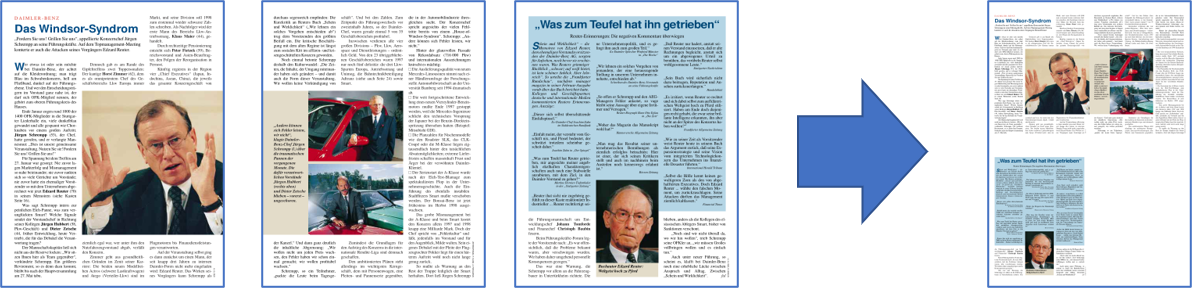
단일 페이지 결합
이것은 PDF 페이지를 결합하여 원본 두 개 또는 네 개를 각각 결합한 페이지가 있는 새 PDF 를 만드는 것을 다룹니다(“2-up”, “4-up” 등이라고도 함). 이것은 소책자나 썸네일 같은 개요를 만드는 데 사용할 수 있습니다.
import pymupdf

src = pymupdf.open("test.pdf")
doc = pymupdf.open()  # empty output PDF

width, height = pymupdf.paper_size("a4")  # A4 portrait output page format
r = pymupdf.Rect(0, 0, width, height)

# define the 4 rectangles per page
r1 = r / 2  # top left rect
r2 = r1 + (r1.width, 0, r1.width, 0)  # top right
r3 = r1 + (0, r1.height, 0, r1.height)  # bottom left
r4 = pymupdf.Rect(r1.br, r.br)  # bottom right

# put them in a list
r_tab = [r1, r2, r3, r4]

# now copy input pages to output
for spage in src:
    if spage.number % 4 == 0:  # create new output page
        page = doc.new_page(-1,
                      width = width,
                      height = height)
    # insert input page into the correct rectangle
    page.show_pdf_page(r_tab[spage.number % 4],  # select output rect
                     src,  # input document
                     spage.number)  # input page number

# by all means, save new file using garbage collection and compression
doc.save("4up.pdf", garbage=3, deflate=True)
예제:
PDF 암호화 및 복호화
버전 1.16.0부터 PDF 복호화 및 암호화(비밀번호 사용)가 완전히 지원됩니다. 다음을 수행할 수 있습니다:
문서가 비밀번호로 보호되어 있는지/(여전히) 암호화되어 있는지 확인합니다(
Document.needs_pass,Document.is_encrypted).문서에 대한 액세스 권한을 얻습니다(
Document.authenticate()).Document.save()또는Document.write()를 사용하여 PDF 파일의 암호화 세부 정보를 설정하고콘텐츠 복호화 또는 암호화
비밀번호 설정
암호화 방법 설정
권한 세부 정보 설정
참고
PDF 문서는 두 가지 다른 비밀번호를 가질 수 있습니다:
소유자 비밀번호 는 비밀번호, 암호화 방법 또는 권한 세부 정보 변경을 포함한 전체 액세스 권한을 제공합니다.
사용자 비밀번호 는 설정된 권한 세부 정보에 따라 문서 콘텐츠에 대한 액세스를 제공합니다. 있는 경우 뷰어에서 PDF 를 열려면 이를 제공해야 합니다.
Document.authenticate() 메서드는 사용된 비밀번호에 따라 액세스 권한을 자동으로 설정합니다.
다음 코드 조각은 새 PDF 를 생성하고 별도의 사용자 및 소유자 비밀번호로 암호화합니다. 인쇄, 복사 및 주석 달기 권한이 부여되지만 사용자 비밀번호로 인증하는 사람에게는 변경이 허용되지 않습니다.
import pymupdf

text = "some secret information" # keep this data secret
perm = int(
    pymupdf.PDF_PERM_ACCESSIBILITY # always use this
    | pymupdf.PDF_PERM_PRINT # permit printing
    | pymupdf.PDF_PERM_COPY # permit copying
    | pymupdf.PDF_PERM_ANNOTATE # permit annotations
)
owner_pass = "owner" # owner password
user_pass = "user" # user password
encrypt_meth = pymupdf.PDF_ENCRYPT_AES_256 # strongest algorithm
doc = pymupdf.open() # empty pdf
page = doc.new_page() # empty page
page.insert_text((50, 72), text) # insert the data
doc.save(
    "secret.pdf",
    encryption=encrypt_meth, # set the encryption method
    owner_pw=owner_pass, # set the owner password
    user_pw=user_pass, # set the user password
    permissions=perm, # set permissions
)
참고
더 알아보기
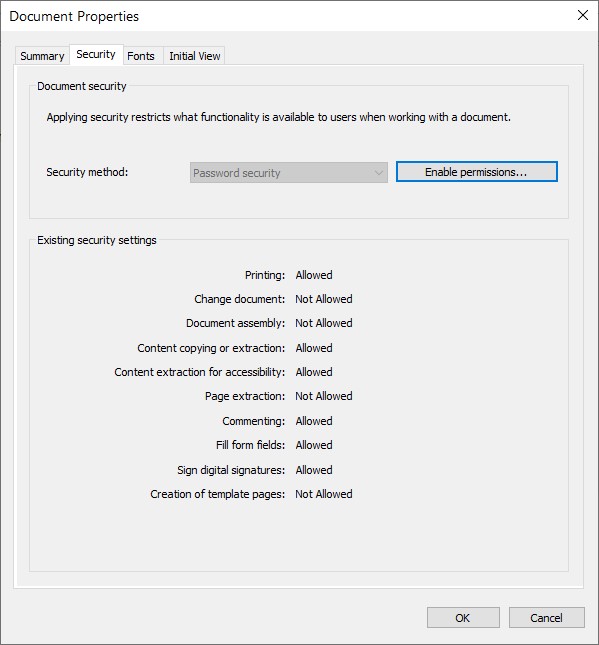
일부 뷰어(Nitro Reader 5)로 이 문서를 열면 이러한 설정이 반영됩니다:
복호화 는 암호화 매개변수가 제공되지 않으면 이전과 같이 저장 시 자동으로 발생합니다.
PDF의 암호화 방법을 유지 하려면 encryption=pymupdf.PDF_ENCRYPT_KEEP 를 사용하여 저장합니다. doc.can_save_incrementally() == True 인 경우 증분 저장도 가능합니다.
암호화 방법을 변경 하려면 위의 전체 옵션 범위(encryption, owner_pw, user_pw, permissions)를 지정합니다. 이 경우 증분 저장은 불가능 합니다.
API 참조
Page 에서 테이블 추출
테이블은 모든 문서 Page 에서 찾고 추출할 수 있습니다.
import pymupdf
from pprint import pprint

doc = pymupdf.open("test.pdf") # open document
page = doc[0] # get the 1st page of the document
tabs = page.find_tables() # locate and extract any tables on page
print(f"{len(tabs.tables)} found on {page}") # display number of found tables

if tabs.tables:  # at least one table found?
   pprint(tabs[0].extract())  # print content of first table
중요
원하는 경우 테이블 추출이 가능한 pdf2docx extract tables method 도 있습니다.
페이지 링크 가져오기
링크는 Page 에서 추출하여 Link 객체를 반환할 수 있습니다.
import pymupdf

for page in doc: # iterate the document pages
    link = page.first_link  # a `Link` object or `None`

    while link: # iterate over the links on page
        # do something with the link, then:
        link = link.next # get next link, last one has `None` in its `next`
문서에서 모든 주석 가져오기
페이지의 주석(Annot (주석))은 page.annots() 메서드로 검색할 수 있습니다.
import pymupdf

for page in doc:
    for annot in page.annots():
        print(f'Annotation on page: {page.number} with type: {annot.type} and rect: {annot.rect}')
PDF 에서 콘텐츠 편집
편집은 문서 페이지에 표시되어 안전하게 제거해야 하는 페이지 영역을 나타내는 특수한 유형의 주석입니다. 사각형으로 영역을 표시한 후 이 영역은 편집 으로 표시되며, 편집이 적용 되면 콘텐츠가 안전하게 제거됩니다.
예를 들어 문서에서 이름 “Jane Doe” 의 모든 인스턴스를 편집하려면 다음을 수행할 수 있습니다:
import pymupdf

# Open the PDF document
doc = pymupdf.open('test.pdf')

# Iterate over each page of the document
for page in doc:
    # Find all instances of "Jane Doe" on the current page
    instances = page.search_for("Jane Doe")

    # Redact each instance of "Jane Doe" on the current page
    for inst in instances:
        page.add_redact_annot(inst)

    # Apply the redactions to the current page
    page.apply_redactions()

# Save the modified document
doc.save('redacted_document.pdf')

# Close the document
doc.close()
다른 예제는 페이지의 영역을 편집하되, 다음처럼 매개변수 플래그를 설정하여 정의된 영역 내의 선 아트(즉, 벡터 그래픽)는 편집하지 않는 것입니다:
import pymupdf

# Open the PDF document
doc = pymupdf.open('test.pdf')

# Get the first page
page = doc[0]

# Add an area to redact
rect = [0,0,200,200]

# Add a redacction annotation which will have a red fill color
page.add_redact_annot(rect, fill=(1,0,0))

# Apply the redactions to the current page, but ignore vector graphics
page.apply_redactions(graphics=0)

# Save the modified document
doc.save('redactied_document.pdf')

# Close the document
doc.close()
경고
문서의 편집된 버전이 저장되면 PDF 의 편집된 콘텐츠는 복구할 수 없습니다. 따라서 문서의 편집된 영역은 해당 영역에서 텍스트와 그래픽을 완전히 제거합니다.
참고
더 알아보기
페이지에 편집을 생성하고 적용하는 몇 가지 옵션이 있습니다. 이러한 옵션을 제어하는 매개변수를 이해하려면 전체 API 세부 정보는 API 참조를 참조하세요.
API 참조
PDF 문서 변환
See 파일 변환 for how to convert PDF documents to other formats and vice versa.
Detecting if a page is black and white
A simple check to determine if a page is pure black and white (“monochrome”). Non-monochrome means that the page has multiple gray levels or colors.
This can be done by using the Page.get_pixmap() method to get a pixmap of the page and then checking the is_monochrome attribute of the pixmap. We need to ensure that there is no anti-aliasing applied to the pixmap, so we set the anti-aliasing level to 0 using Tools.set_aa_level().
The following example demonstrates how to do this for each page in a PDF document:
import pymupdf

pymupdf.TOOLS.set_aa_level(0) # prevent anti-aliasing

def analyze_pdf(path):

    results = []

    with pymupdf.open(path) as doc:
        for i, page in enumerate(doc):
            pix=page.get_pixmap(colorspace=pymupdf.csGRAY)
            bw = pix.is_monochrome

            results.append(bw)
            label = "black & white" if bw==1 else "has color"
            print(f"Page {i + 1}/{len(doc)}: {label}")

    return results

if __name__ == "__main__":
    import sys

    if len(sys.argv) < 2:
        print("Usage: python detect_bw_pages.py <file.pdf>")
        sys.exit(1)

    pdf_path = sys.argv[1]
    analyze_pdf(pdf_path)