주석
주석 추가 및 수정 방법
PyMuPDF 에서는 Page 메서드를 통해 새로운 주석을 추가할 수 있습니다. 주석이 존재하면 Annot (주석) 클래스의 메서드를 사용하여 대부분 수정할 수 있습니다.
주석은 PDF 페이지에만 삽입할 수 있습니다. 다른 문서 유형은 주석 삽입을 지원하지 않습니다.
다른 많은 도구와 달리, 주석의 초기 삽입은 최소한의 속성으로 수행됩니다. 예를 들어 작성자, 생성 날짜 또는 제목과 같은 속성을 설정하는 것은 프로그래머에게 맡깁니다.
이러한 기능에 대한 개요로, 사용 가능한 대부분의 주석으로 PDF 페이지를 채우는 다음 스크립트를 참조하세요. 더 특수한 상황에 대해서는 다음 섹션을 참조하세요:
# -*- coding: utf-8 -*-
"""
-------------------------------------------------------------------------------
Demo script showing how annotations can be added to a PDF using PyMuPDF.

It contains the following annotation types:
Caret, Text, FreeText, text markers (underline, strike-out, highlight,
squiggle), Circle, Square, Line, PolyLine, Polygon, FileAttachment, Stamp
and Redaction.
There is some effort to vary appearances by adding colors, line ends,
opacity, rotation, dashed lines, etc.

Dependencies
------------
PyMuPDF v1.17.0
-------------------------------------------------------------------------------
"""
from __future__ import print_function

import gc
import sys

import pymupdf

print(pymupdf.__doc__)
if pymupdf.VersionBind.split(".") < ["1", "17", "0"]:
    sys.exit("PyMuPDF v1.17.0+ is needed.")

gc.set_debug(gc.DEBUG_UNCOLLECTABLE)

highlight = "this text is highlighted"
underline = "this text is underlined"
strikeout = "this text is striked out"
squiggled = "this text is zigzag-underlined"
red = (1, 0, 0)
blue = (0, 0, 1)
gold = (1, 1, 0)
green = (0, 1, 0)

displ = pymupdf.Rect(0, 50, 0, 50)
r = pymupdf.Rect(72, 72, 220, 100)
t1 = u"têxt üsès Lätiñ charß,\nEUR: €, mu: µ, super scripts: ²³!"


def print_descr(annot):
    """Print a short description to the right of each annot rect."""
    annot.parent.insert_text(
        annot.rect.br + (10, -5), f"{annot.type[1]} annotation", color=red)


doc = pymupdf.open()
page = doc.new_page()

page.set_rotation(0)

annot = page.add_caret_annot(r.tl)
print_descr(annot)

r = r + displ
annot = page.add_freetext_annot(
    r,
    t1,
    fontsize=10,
    rotate=90,
    text_color=blue,
    fill_color=gold,
    align=pymupdf.TEXT_ALIGN_CENTER,
)
annot.set_border(width=0.3, dashes=[2])
annot.update(text_color=blue, fill_color=gold)
print_descr(annot)

r = annot.rect + displ
annot = page.add_text_annot(r.tl, t1)
print_descr(annot)

# Adding text marker annotations:
# first insert a unique text, then search for it, then mark it
pos = annot.rect.tl + displ.tl
page.insert_text(
    pos,  # insertion point
    highlight,  # inserted text
    morph=(pos, pymupdf.Matrix(-5)),  # rotate around insertion point
)
rl = page.search_for(highlight, quads=True)  # need a quad b/o tilted text
annot = page.add_highlight_annot(rl[0])
print_descr(annot)

pos = annot.rect.bl  # next insertion point
page.insert_text(pos, underline, morph=(pos, pymupdf.Matrix(-10)))
rl = page.search_for(underline, quads=True)
annot = page.add_underline_annot(rl[0])
print_descr(annot)

pos = annot.rect.bl
page.insert_text(pos, strikeout, morph=(pos, pymupdf.Matrix(-15)))
rl = page.search_for(strikeout, quads=True)
annot = page.add_strikeout_annot(rl[0])
print_descr(annot)

pos = annot.rect.bl
page.insert_text(pos, squiggled, morph=(pos, pymupdf.Matrix(-20)))
rl = page.search_for(squiggled, quads=True)
annot = page.add_squiggly_annot(rl[0])
print_descr(annot)

pos = annot.rect.bl
r = pymupdf.Rect(pos, pos.x + 75, pos.y + 35) + (0, 20, 0, 20)
annot = page.add_polyline_annot([r.bl, r.tr, r.br, r.tl])  # 'Polyline'
annot.set_border(width=0.3, dashes=[2])
annot.set_colors(stroke=blue, fill=green)
annot.set_line_ends(pymupdf.PDF_ANNOT_LE_CLOSED_ARROW, pymupdf.PDF_ANNOT_LE_R_CLOSED_ARROW)
annot.update(fill_color=(1, 1, 0))
print_descr(annot)

r += displ
annot = page.add_polygon_annot([r.bl, r.tr, r.br, r.tl])  # 'Polygon'
annot.set_border(width=0.3, dashes=[2])
annot.set_colors(stroke=blue, fill=gold)
annot.set_line_ends(pymupdf.PDF_ANNOT_LE_DIAMOND, pymupdf.PDF_ANNOT_LE_CIRCLE)
annot.update()
print_descr(annot)

r += displ
annot = page.add_line_annot(r.tr, r.bl)  # 'Line'
annot.set_border(width=0.3, dashes=[2])
annot.set_colors(stroke=blue, fill=gold)
annot.set_line_ends(pymupdf.PDF_ANNOT_LE_DIAMOND, pymupdf.PDF_ANNOT_LE_CIRCLE)
annot.update()
print_descr(annot)

r += displ
annot = page.add_rect_annot(r)  # 'Square'
annot.set_border(width=1, dashes=[1, 2])
annot.set_colors(stroke=blue, fill=gold)
annot.update(opacity=0.5)
print_descr(annot)

r += displ
annot = page.add_circle_annot(r)  # 'Circle'
annot.set_border(width=0.3, dashes=[2])
annot.set_colors(stroke=blue, fill=gold)
annot.update()
print_descr(annot)

r += displ
annot = page.add_file_annot(
    r.tl, b"just anything for testing", "testdata.txt"  # 'FileAttachment'
)
print_descr(annot)  # annot.rect

r += displ
annot = page.add_stamp_annot(r, stamp=10)  # 'Stamp'
annot.set_colors(stroke=green)
annot.update()
print_descr(annot)

r += displ + (0, 0, 50, 10)
rc = page.insert_textbox(
    r,
    "This content will be removed upon applying the redaction.",
    color=blue,
    align=pymupdf.TEXT_ALIGN_CENTER,
)
annot = page.add_redact_annot(r)
print_descr(annot)

doc.save(__file__.replace(".py", f"-{page.rotation:d}.pdf"), deflate=True)
이 스크립트는 다음과 같은 출력을 생성해야 합니다:

FreeText 사용 방법
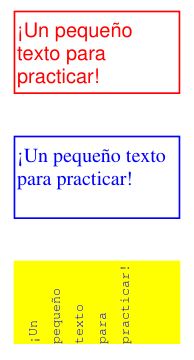
이 스크립트는 ‘FreeText’ 주석을 처리하는 몇 가지 기본 방법을 보여줍니다:
# -*- coding: utf-8 -*-
import pymupdf

# some colors
blue = (0, 0, 1)
green = (0, 1, 0)
red = (1, 0, 0)
gold = (1, 1, 0)

# a new PDF with 1 page
doc = pymupdf.open()
page = doc.new_page()

# 3 rectangles, same size, above each other
r1 = pymupdf.Rect(100, 100, 200, 150)
r2 = r1 + (0, 75, 0, 75)
r3 = r2 + (0, 75, 0, 75)

# the text, Latin alphabet
t = "¡Un pequeño texto para practicar!"

# add 3 annots, modify the last one somewhat
a1 = page.add_freetext_annot(r1, t, text_color=red)
a2 = page.add_freetext_annot(r2, t, fontname="Ti", text_color=blue)
a3 = page.add_freetext_annot(r3, t, fontname="Co", text_color=blue, rotate=90)
a3.set_border(width=0)
a3.update(fontsize=8, fill_color=gold)

# save the PDF
doc.save("a-freetext.pdf")
결과는 다음과 같습니다:
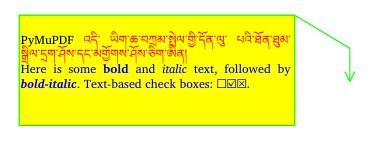
다음은 서식 있는 텍스트와 설명선을 사용하는 예제입니다:
import pymupdf

"""Use rich text for FreeText annotations"""

# define an overall styling
ds = """font-size: 11pt; font-family: sans-serif;"""

# some special characters
bullet = chr(0x2610) + chr(0x2611) + chr(0x2612)

# the annotation text with HTML and styling syntax
text = f"""<p style="text-align:justify;margin-top:-25px;">
PyMuPDF <span style="color: red;">འདི་ ཡིག་ཆ་བཀྲམ་སྤེལ་གྱི་དོན་ལུ་ པའི་ཐོན་ཐུམ་སྒྲིལ་དྲག་ཤོས་དང་མགྱོགས་ཤོས་ཅིག་ཨིན།</span>
<span style="color:blue;">Here is some <b>bold</b> and <i>italic</i> text, followed by <b><i>bold-italic</i></b>. Text-based check boxes: {bullet}.</span>
 </p>"""

# here are some colors
gold = (1, 1, 0)
green = (0, 1, 0)

# new/empty PDF
doc = pymupdf.open()

# make a page in ISO-A4 format
page = doc.new_page()

# text goes into this:
rect = pymupdf.Rect(100, 100, 350, 200)

# define some points for callout lines
p2 = rect.tr + (50, 30)
p3 = p2 + (0, 30)

# define the annotation
annot = page.add_freetext_annot(
    rect,
    text,
    fill_color=gold,  # fill color
    opacity=1,  # non-transparent
    rotate=0,  # no rotation
    border_width=1,  # border and callout line width
    dashes=None,  # no dashing
    richtext=True,  # this is rich text
    style=ds,  # my styling default
    callout=(p3, p2, rect.tr),  # define end, knee, start points
    line_end=pymupdf.PDF_ANNOT_LE_OPEN_ARROW,  # symbol shown at p3
    border_color=green,
)

doc.save(__file__.replace(".py", ".pdf"), pretty=True)
결과는 다음과 같습니다:
잉크 주석 사용 방법
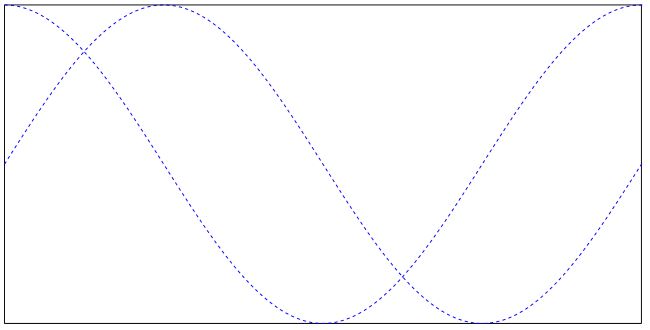
잉크 주석은 손으로 그린 낙서를 포함하는 데 사용됩니다. 일반적인 예로는 이름과 성으로 구성된 서명 이미지가 있을 수 있습니다. 기술적으로 잉크 주석은 점 목록의 목록 으로 구현됩니다. 각 점 목록은 점을 연결하는 연속 선으로 간주됩니다. 서로 다른 점 목록은 주석의 독립적인 선 세그먼트를 나타냅니다.
다음 스크립트는 두 개의 수학 곡선(사인 및 코사인 함수 그래프)을 선 세그먼트로 사용하여 잉크 주석을 생성합니다:
import math
import pymupdf

#------------------------------------------------------------------------------
# preliminary stuff: create function value lists for sine and cosine
#------------------------------------------------------------------------------
w360 = math.pi * 2  # go through full circle
deg = w360 / 360  # 1 degree as radians
rect = pymupdf.Rect(100,200, 300, 300)  # use this rectangle
first_x = rect.x0  # x starts from left
first_y = rect.y0 + rect.height / 2.  # rect middle means y = 0
x_step = rect.width / 360  # rect width means 360 degrees
y_scale = rect.height / 2.  # rect height means 2
sin_points = []  # sine values go here
cos_points = []  # cosine values go here
for x in range(362):  # now fill in the values
    x_coord = x * x_step + first_x  # current x coordinate
    y = -math.sin(x * deg)  # sine
    p = (x_coord, y * y_scale + first_y)  # corresponding point
    sin_points.append(p)  # append
    y = -math.cos(x * deg)  # cosine
    p = (x_coord, y * y_scale + first_y)  # corresponding point
    cos_points.append(p)  # append

#------------------------------------------------------------------------------
# create the document with one page
#------------------------------------------------------------------------------
doc = pymupdf.open()  # make new PDF
page = doc.new_page()  # give it a page

#------------------------------------------------------------------------------
# add the Ink annotation, consisting of 2 curve segments
#------------------------------------------------------------------------------
annot = page.add_ink_annot((sin_points, cos_points))
# let it look a little nicer
annot.set_border(width=0.3, dashes=[1,])  # line thickness, some dashing
annot.set_colors(stroke=(0,0,1))  # make the lines blue
annot.update()  # update the appearance

page.draw_rect(rect, width=0.3)  # only to demonstrate we did OK

doc.save("a-inktest.pdf")
결과는 다음과 같습니다: