基本
ファイルを開く
ファイルを開くには、以下の手順を実行してください:
import pymupdf

doc = pymupdf.open("a.pdf") # open a document
PDF からテキストを抽出する
PDF ファイルからすべてのテキストを抽出するには、以下の手順を実行してください:
import pymupdf

doc = pymupdf.open("a.pdf") # open a document
out = open("output.txt", "wb") # create a text output
for page in doc: # iterate the document pages
    text = page.get_text().encode("utf8") # get plain text (is in UTF-8)
    out.write(text) # write text of page
    out.write(bytes((12,))) # write page delimiter (form feed 0x0C)
out.close()
もちろん、PDFだけでなく、MOBI、EPUB、TXTなどの サポートされているドキュメントファイル形式 でもテキストを抽出できます。
注釈
さらに進む
もし文書に画像ベースのテキストコンテンツが含まれている場合は、後続のテキスト抽出のためにそのページでOCRを使用してください。
tp = page.get_textpage_ocr()
text = page.get_text(textpage=tp)
特定の領域からテキストを抽出する方法や、文書から表を抽出する方法など、さらに多くの例があります。テキストの方法ガイドを参照してください。
Markdown形式でテキストを抽出 することもできます。
APIリファレンス
PDF から画像を抽出する
PDF すべての画像を抽出するには、以下の手順を実行してください:
import pymupdf

doc = pymupdf.open("test.pdf") # open a document

for page_index in range(len(doc)): # iterate over pdf pages
    page = doc[page_index] # get the page
    image_list = page.get_images()

    # print the number of images found on the page
    if image_list:
        print(f"Found {len(image_list)} images on page {page_index}")
    else:
        print("No images found on page", page_index)

    for image_index, img in enumerate(image_list, start=1): # enumerate the image list
        xref = img[0] # get the XREF of the image
        pix = pymupdf.Pixmap(doc, xref) # create a Pixmap

        if pix.n - pix.alpha > 3: # CMYK: convert to RGB first
            pix = pymupdf.Pixmap(pymupdf.csRGB, pix)

        pix.save(f"page_{page_index}-image_{image_index}.png") # save the image as png
        pix = None
注釈
さらに進む
特定の領域からテキストを抽出する方法や、文書から表を抽出する方法など、さらに多くの例があります。テキストの方法ガイドを参照してください。
APIリファレンス
ベクトルグラフィックスを抽出
ドキュメントのページからすべてのベクトルグラフィックスを抽出するには、以下の手順に従います:
doc = pymupdf.open("some.file")
page = doc[0]
paths = page.get_drawings()
これにより、ページ上で見つかったすべてのベクター図形のパスの辞書が返されます。
PDF ファイルの結合
PDF ファイルを結合するには、以下の手順を実行してください:
import pymupdf

doc_a = pymupdf.open("a.pdf") # open the 1st document
doc_b = pymupdf.open("b.pdf") # open the 2nd document

doc_a.insert_pdf(doc_b) # merge the docs
doc_a.save("a+b.pdf") # save the merged document with a new filename
PDF ァイルと他の種類のファイルを結合する
Document.insert_file() を使用すると、サポートされているファイルをPDFと結合するメソッドを呼び出すことができます。例えば:
import pymupdf

doc_a = pymupdf.open("a.pdf") # open the 1st document
doc_b = pymupdf.open("b.svg") # open the 2nd document

doc_a.insert_file(doc_b) # merge the docs
doc_a.save("a+b.pdf") # save the merged document with a new filename
注釈
さらに進む
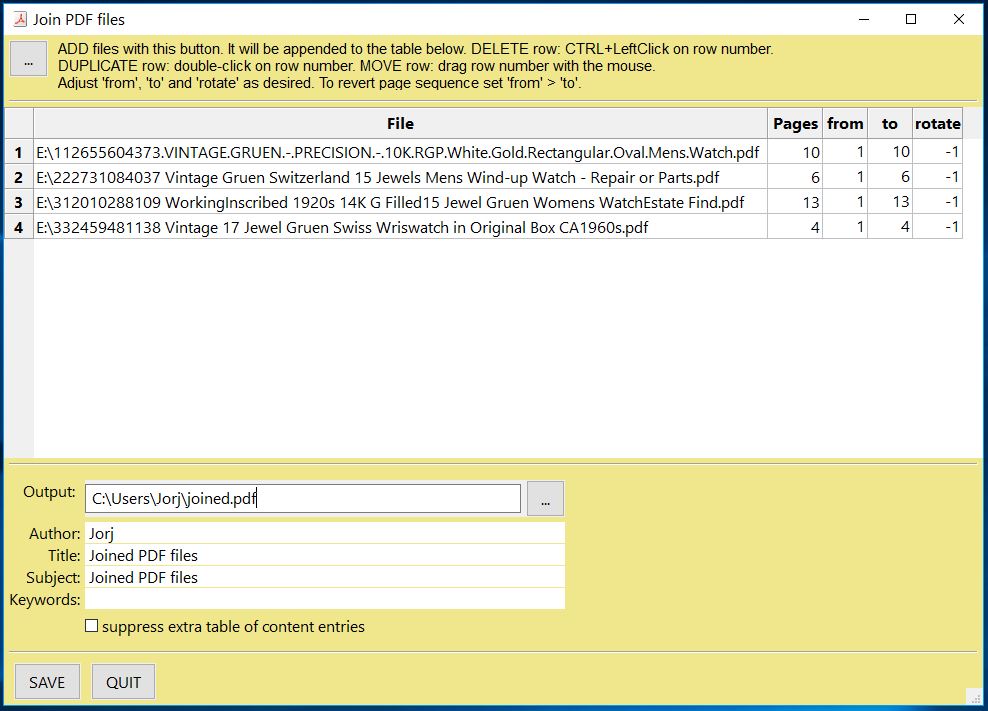
It is easy to join PDFs with Document.insert_pdf() & Document.insert_file(). Given open PDF documents, you can copy page ranges from one to the other. You can select the point where the copied pages should be placed, you can revert the page sequence and also change page rotation.
GUIスクリプト join.py では、この方法を使用してファイルのリストを結合し、それぞれの目次セグメントも結合します。スクリプトの見た目は以下のようになっています:
APIリファレンス
座標を扱う
PyMuPDF を使用する際に快適に感じるべき 数学用語 が1つあります - 「座標」 です。オブジェクトの配置や文書空間の理解に役立つ座標系を理解するために、脚注 セクションを簡単にご覧ください。
PDF ファイルにウォータマークを追加する方法
PDF ファイルにウォータマークを追加するには、以下の手順を実行してください:
import pymupdf

doc = pymupdf.open("document.pdf") # open a document

for page_index in range(len(doc)): # iterate over pdf pages
    page = doc[page_index] # get the page

    # insert an image watermark from a file name to fit the page bounds
    page.insert_image(page.bound(),filename="watermark.png", overlay=False)

doc.save("watermarked-document.pdf") # save the document with a new filename
注釈
さらに進む
ウォータマークを追加することは、基本的には各PDFページの底辺に画像を追加するだけです。画像が必要な透明度とアスペクト比を持っていることを確認して、必要な見た目になるようにします。
前述の例では、各ファイル参照から新しい画像が作成されていますが、メモリとファイルサイズを節約するために、この画像データは1回だけ参照されるようにすると、パフォーマンスが向上します - Page.insert_image()のコード例と説明を参照してください。
APIリファレンス
PDF に画像を追加する
PDFファイルに画像を追加するためには、例えばロゴを追加する場合、以下の手順を実行してください:
import pymupdf

doc = pymupdf.open("document.pdf") # open a document

for page_index in range(len(doc)): # iterate over pdf pages
    page = doc[page_index] # get the page

    # insert an image logo from a file name at the top left of the document
    page.insert_image(pymupdf.Rect(0,0,50,50),filename="my-logo.png")

doc.save("logo-document.pdf") # save the document with a new filename
注釈
さらに進む
ウォータマークの例と同様に、できる限り画像を1回だけ参照することで、より効率的な処理を行うようにしてください。詳細は Page.insert_image() のコード例と説明を参照してください。
APIリファレンス
PDF を回転させる
ページに回転を追加するには、以下の手順を実行してください:
import pymupdf

doc = pymupdf.open("test.pdf") # open document
page = doc[0] # get the 1st page of the document
page.set_rotation(90) # rotate the page
doc.save("rotated-page-1.pdf")
PDF のトリミング
定義された矩形 Rect にページをトリミングするには、以下の手順を実行してください:
import pymupdf

doc = pymupdf.open("test.pdf") # open document
page = doc[0] # get the 1st page of the document
page.set_cropbox(pymupdf.Rect(100, 100, 400, 400)) # set a cropbox for the page
doc.save("cropped-page-1.pdf")
ファイルの添付
別のファイルをページに添付するには、以下の手順を実行してください:
import pymupdf

doc = pymupdf.open("test.pdf") # open main document
attachment = pymupdf.open("my-attachment.pdf") # open document you want to attach

page = doc[0] # get the 1st page of the document
point = pymupdf.Point(100, 100) # create the point where you want to add the attachment
attachment_data = attachment.tobytes() # get the document byte data as a buffer

# add the file annotation with the point, data and the file name
file_annotation = page.add_file_annot(point, attachment_data, "attachment.pdf")

doc.save("document-with-attachment.pdf") # save the document
注釈
さらに進む
Page.add_file_annot() でファイルを追加する際には、ファイル名を指定する第三引数には実際のファイルの拡張子を含める必要があります。これがないと、添付ファイルが開けるものとして認識されない可能性があります。例えば、ファイル名が単に「attachment」とだけ指定されている場合、生成されたPDFを見て添付ファイルを開こうとするとエラーが発生するかもしれません。しかし、「attachment.pdf」と指定されている場合、PDFビューアーで有効なファイルタイプとして認識され、開くことができます。
添付ファイルのデフォルトアイコンは「押しピン」ですが、 icon パラメータを設定することでこれを変更することができます。
APIリファレンス
ファイルを埋め込む
ファイルを文書に埋め込むには、以下の手順を実行してください:
import pymupdf

doc = pymupdf.open("test.pdf") # open main document
embedded_doc = pymupdf.open("my-embed.pdf") # open document you want to embed

embedded_data = embedded_doc.tobytes() # get the document byte data as a buffer

# embed with the file name and the data
doc.embfile_add("my-embedded_file.pdf", embedded_data)

doc.save("document-with-embed.pdf") # save the document
注釈
さらに進む
ファイルを添付する場合と同様に、 Document.embfile_add() でファイルを追加する際には、ファイル名を指定する第一引数には実際のファイルの拡張子を含める必要があります
APIリファレンス
ページを削除する
文書からページを削除するには、以下の手順を実行してください:
import pymupdf

doc = pymupdf.open("test.pdf") # open a document
doc.delete_page(0) # delete the 1st page of the document
doc.save("test-deleted-page-one.pdf") # save the document
複数のページを文書から削除するには、以下の手順を実行してください:
import pymupdf

doc = pymupdf.open("test.pdf") # open a document
doc.delete_pages(from_page=9, to_page=14) # delete a page range from the document
doc.save("test-deleted-pages.pdf") # save the document
ブックマークやハイパーリンクで参照されているページを削除した場合、どうなりますか?
ブックマーク(目次のエントリー)は無効になり、もはやどのページにもナビゲートしません
ハイパーリンクは、それを含むページから削除されます。そのページの可視コンテンツは、他の方法で変更されることはありません。
注釈
さらに進む
ページのインデックスは0から始まるため、文書の10ページ目を削除するには、以下のようにします: doc.delete_page(9)。
同様に、 doc.delete_pages(from_page=9, to_page=14) は、ページ10からページ15までを含む範囲のページを削除します。
APIリファレンス
ページを再配置する
ページを再配置するには、以下の手順を実行してください:
import pymupdf

doc = pymupdf.open("test.pdf") # open a document
doc.move_page(1,0) # move the 2nd page of the document to the start of the document
doc.save("test-page-moved.pdf") # save the document
ページをコピーする
ページをコピーするには、以下の手順を実行してください:
import pymupdf

doc = pymupdf.open("test.pdf") # open a document
doc.copy_page(0) # copy the 1st page and puts it at the end of the document
doc.save("test-page-copied.pdf") # save the document
ページを選択する
ページを選択するには、以下の手順を実行してください:
import pymupdf

doc = pymupdf.open("test.pdf") # open a document
doc.select([0, 1]) # select the 1st & 2nd page of the document
doc.save("just-page-one-and-two.pdf") # save the document
注釈
さらに進む
PyMuPDF を使用すると、 PDF のページをコピー、移動、削除、または再配置するためのオプションがすべて揃っています。 Document.copy_page() メソッドのように、ページ単位で直感的なメソッドを使用してこれらの操作を行うことができます。
または、 Python のシーケンスとして完全な新しいページレイアウトを準備し、希望するページ番号を希望する順序で含め、必要なページ数だけ繰り返すこともできます。次の例は、 Document.select() を使用した可能性を示しています。
doc.select([1, 1, 1, 5, 4, 9, 9, 9, 0, 2, 2, 2])
以下のように、両面印刷用にPDFを準備しましょう(直接これをサポートしていないプリンターで):
ページ数は len(doc)`( `doc.page_count と同じ)で与えられます。以下のリストは、それぞれ偶数ページと奇数ページの番号を表しています:
p_even = [p in range(doc.page_count) if p % 2 == 0]
p_odd  = [p in range(doc.page_count) if p % 2 == 1]
このスニペットは、それぞれのサブドキュメントを作成し、それらを使用してドキュメントを印刷することができます:
doc.select(p_even) # only the even pages left over
doc.save("even.pdf") # save the "even" PDF
doc.close() # recycle the file
doc = pymupdf.open(doc.name) # re-open
doc.select(p_odd) # and do the same with the odd pages
doc.save("odd.pdf")
詳細については、この ウィキの記事 もご覧ください。
次の例は、すべてのページの順序を逆にするものです(非常に高速: Adobe PDFリファレンス リファレンスの756ページをサブセカンドの時間で処理します)。
lastPage = doc.page_count - 1
for i in range(lastPage):
    doc.move_page(lastPage, i) # move current last page to the front
このスニペットは、PDFを自身と重複させることで、ページ0、1、…、n、0、1、…、nを含むようにします(非常に高速で、ファイルサイズをほとんど増やさずに実現します!):
page_count = len(doc)
for i in range(page_count):
    doc.copy_page(i) # copy this page to after last page
APIリファレンス
空白のページを追加する
空白のページを追加するには、以下の手順を行います:
import pymupdf

doc = pymupdf.open(...) # some new or existing PDF document
page = doc.new_page(-1, # insertion point: end of document
                    width = 595, # page dimension: A4 portrait
                    height = 842)
doc.save("doc-with-new-blank-page.pdf") # save the document
注釈
さらに進む
以下の方法を使用して、別の事前定義された用紙フォーマットを使ってページを作成します:
w, h = pymupdf.paper_size("letter-l")  # 'Letter' landscape
page = doc.new_page(width = w, height = h)
便利な関数 paper_size() は、40以上の業界標準の用紙フォーマットを選択できます。それらを確認するには、辞書 attr:paperSizes を調べてください。用紙の寸法を取得するために、希望する辞書キーを paper_size() に渡します。大文字と小文字の両方がサポートされています。フォーマット名に「-L」を追加すると、横長バージョンが返されます。
以下は、1ページの空白の PDF: を作成するための3行のコードです。ファイルサイズは460バイトです。
doc = pymupdf.open()
doc.new_page()
doc.save("A4.pdf")
APIリファレンス
paperSizes
ページにテキストコンテンツを挿入する
Using the Document.insert_page() method also inserts a new page and accepts the same width and height parameters. But it lets you also insert arbitrary text into the new page and returns the number of inserted lines.
import pymupdf

doc = pymupdf.open(...)  # some new or existing PDF document
n = doc.insert_page(-1, # default insertion point
                    text = "The quick brown fox jumped over the lazy dog",
                    fontsize = 11,
                    width = 595,
                    height = 842,
                    fontname = "Helvetica", # default font
                    fontfile = None, # any font file name
                    color = (0, 0, 0)) # text color (RGB)
注釈
さらに進む
テキストパラメーターは、UTF-8エンコーディングを想定している(シーケンスの)文字列です。挿入はページの上端から1インチ下であるポイント Point (ポイント) (50, 72) から始まり、左から50ポイントの位置です。挿入されたテキストの行数が返されます。
APIリファレンス
単一のページを分割する
この方法は、 PDF のページを任意の部分に分割することに関連しています。例えば、Letterフォーマットのページを含む PDF を、4倍の拡大率で印刷したい場合を考えてみましょう。各ページは4つの部分に分割され、それぞれが再びLetterフォーマットの個別の PDF ページになります。
import pymupdf

src = pymupdf.open("test.pdf")
doc = pymupdf.open()  # empty output PDF

for spage in src:  # for each page in input
    r = spage.rect  # input page rectangle
    d = pymupdf.Rect(spage.cropbox_position,  # CropBox displacement if not
                  spage.cropbox_position)  # starting at (0, 0)
    #--------------------------------------------------------------------------
    # example: cut input page into 2 x 2 parts
    #--------------------------------------------------------------------------
    r1 = r / 2  # top left rect
    r2 = r1 + (r1.width, 0, r1.width, 0)  # top right rect
    r3 = r1 + (0, r1.height, 0, r1.height)  # bottom left rect
    r4 = pymupdf.Rect(r1.br, r.br)  # bottom right rect
    rect_list = [r1, r2, r3, r4]  # put them in a list

    for rx in rect_list:  # run thru rect list
        rx += d  # add the CropBox displacement
        page = doc.new_page(-1,  # new output page with rx dimensions
                           width = rx.width,
                           height = rx.height)
        page.show_pdf_page(
                page.rect,  # fill all new page with the image
                src,  # input document
                spage.number,  # input page number
                clip = rx,  # which part to use of input page
            )

# that's it, save output file
doc.save("poster-" + src.name,
         garbage=3,  # eliminate duplicate objects
         deflate=True,  # compress stuff where possible
)
例:

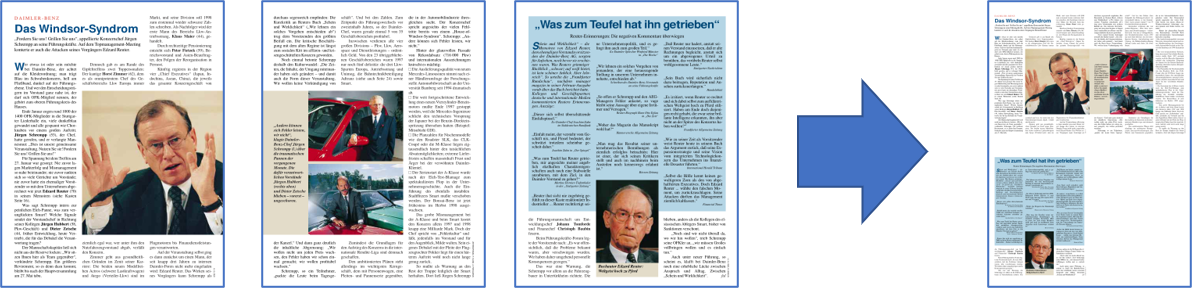
単一のページを結合する
これは、2つまたは4つの元のページを組み合わせた新しい PDF を作成することを意味します(または「2-up」、「4-up」などとも呼ばれます)。これは、ブックレットやサムネイルのような概要を作成するために使用できます。
import pymupdf

src = pymupdf.open("test.pdf")
doc = pymupdf.open()  # empty output PDF

width, height = pymupdf.paper_size("a4")  # A4 portrait output page format
r = pymupdf.Rect(0, 0, width, height)

# define the 4 rectangles per page
r1 = r / 2  # top left rect
r2 = r1 + (r1.width, 0, r1.width, 0)  # top right
r3 = r1 + (0, r1.height, 0, r1.height)  # bottom left
r4 = pymupdf.Rect(r1.br, r.br)  # bottom right

# put them in a list
r_tab = [r1, r2, r3, r4]

# now copy input pages to output
for spage in src:
    if spage.number % 4 == 0:  # create new output page
        page = doc.new_page(-1,
                      width = width,
                      height = height)
    # insert input page into the correct rectangle
    page.show_pdf_page(r_tab[spage.number % 4],  # select output rect
                     src,  # input document
                     spage.number)  # input page number

# by all means, save new file using garbage collection and compression
doc.save("4up.pdf", garbage=3, deflate=True)
例:
PDF の暗号化と復号化
バージョン1.16.0から、PDFの暗号化と復号化(パスワードを使用)が完全にサポートされています。以下のことができます:
ドキュメントがパスワード保護されているか、(まだ)暗号化されているかを確認する(
Document.needs_pass,Document.is_encrypted)。ドキュメントへのアクセス権を取得する(
Document.authenticate())。Document.save()またはDocument.write()を使用して、PDFファイルの暗号化詳細を設定する。内容の復号化または暗号化
パスワードの設定
暗号化方式の設定
権限の詳細設定
注釈
PDF文書には2つの異なるパスワードが存在する場合があります:
オーナーパスワード:パスワードを変更したり、暗号化方法を変更したり、権限の詳細を含む完全なアクセス権を提供します。
ユーザーパスワード:文書の内容にアクセスするための権限詳細に基づいてアクセスを提供します。存在する場合、ビューアでPDFを開く際にユーザーパスワードを入力する必要があります。
メソッド Document.authenticate() は、使用されるパスワードに基づいて自動的にアクセス権を確立します。
以下のスニペットは新しい PDF を作成し、別々のユーザーパスワードとオーナーパスワードで暗号化します。印刷、コピー、注釈付けの権限が与えられますが、ユーザーパスワードで認証するユーザーに対しては変更は許可されません
import pymupdf

text = "some secret information" # keep this data secret
perm = int(
    pymupdf.PDF_PERM_ACCESSIBILITY # always use this
    | pymupdf.PDF_PERM_PRINT # permit printing
    | pymupdf.PDF_PERM_COPY # permit copying
    | pymupdf.PDF_PERM_ANNOTATE # permit annotations
)
owner_pass = "owner" # owner password
user_pass = "user" # user password
encrypt_meth = pymupdf.PDF_ENCRYPT_AES_256 # strongest algorithm
doc = pymupdf.open() # empty pdf
page = doc.new_page() # empty page
page.insert_text((50, 72), text) # insert the data
doc.save(
    "secret.pdf",
    encryption=encrypt_meth, # set the encryption method
    owner_pw=owner_pass, # set the owner password
    user_pw=user_pass, # set the user password
    permissions=perm, # set permissions
)
注釈
さらに進む
このドキュメントをいくつかのビューア(Nitro Reader 5など)で開くと、これらの設定が反映されます:

暗号化パラメータが提供されていない場合、保存時に自動的に復号化されます。
PDFの暗号化方法を保持するには、encryption=pymupdf.PDF_ENCRYPT_KEEP を使用して保存します。また、 doc.can_save_incrementally() == True であれば、増分保存も可能です
暗号化方法を変更する場合は、上記のすべてのオプション(encryption、owner_pw、user_pw、permissions)を指定します。この場合、増分保存はできません。
APIリファレンス
ページからのテーブルの抽出
表はどのドキュメントの Page (ページ) からも見つけて抽出できます。
import pymupdf
from pprint import pprint

doc = pymupdf.open("test.pdf") # open document
page = doc[0] # get the 1st page of the document
tabs = page.find_tables() # locate and extract any tables on page
print(f"{len(tabs.tables)} found on {page}") # display number of found tables

if tabs.tables:  # at least one table found?
   pprint(tabs[0].extract())  # print content of first table
重要
お好みの場合、テーブル抽出が 可能なpdf2docxのextract tablesメソッド もあります。
ページリンクの取得
Page (ページ) からリンクを抽出して Link (リンク) オブジェクトを返すことができます。
import pymupdf

for page in doc: # iterate the document pages
    link = page.first_link  # a `Link` object or `None`

    while link: # iterate over the links on page
        # do something with the link, then:
        link = link.next # get next link, last one has `None` in its `next`
ドキュメントからすべての注釈を取得する
ページ上の注釈 (Annot (注釈)) は、page.annots() メソッドを使用して取得できます。
import pymupdf

for page in doc:
    for annot in page.annots():
        print(f'Annotation on page: {page.number} with type: {annot.type} and rect: {annot.rect}')
PDF からコンテンツを塗りつぶす
マーキングされた領域に矩形を使用して、ページ上の削除されるべき領域を示すために、赤字が付けられる特別なアノテーションです。領域に矩形をマークした後、その領域は赤字としてマークされ、赤字が適用されると、そのコンテンツは安全に削除されます。
たとえば、ドキュメントから名前「ジェーン・ドー」のすべてのインスタンスを塗りつぶしたい場合は、次のようにします:
import pymupdf

# Open the PDF document
doc = pymupdf.open('test.pdf')

# Iterate over each page of the document
for page in doc:
    # Find all instances of "Jane Doe" on the current page
    instances = page.search_for("Jane Doe")

    # Redact each instance of "Jane Doe" on the current page
    for inst in instances:
        page.add_redact_annot(inst)

    # Apply the redactions to the current page
    page.apply_redactions()

# Save the modified document
doc.save('redacted_document.pdf')

# Close the document
doc.close()
別の例として、ページの領域を塗りつぶすが、定義された領域内の線画(ベクトルグラフィックス)を塗りつぶさないように、パラメータフラグを設定することができます。
import pymupdf

# Open the PDF document
doc = pymupdf.open('test.pdf')

# Get the first page
page = doc[0]

# Add an area to redact
rect = [0,0,200,200]

# Add a redacction annotation which will have a red fill color
page.add_redact_annot(rect, fill=(1,0,0))

# Apply the redactions to the current page, but ignore vector graphics
page.apply_redactions(graphics=0)

# Save the modified document
doc.save('redactied_document.pdf')

# Close the document
doc.close()
警告
文書の塗りつぶし済みバージョンを保存すると、PDF 内の塗りつぶされたコンテンツは 取り戻すことができなくなります 。したがって、文書内の塗りつぶされた領域は、その領域からテキストとグラフィックスを完全に削除します。
注釈
さらに進む
ページに赤字を作成して適用するためのいくつかのオプションがあります。これらのオプションを制御するためのパラメータを理解するためには、完全なAPI詳細についてAPIリファレンスを参照してください。
APIリファレンス
PDF ドキュメントの変換
See ファイルの変換 for how to convert PDF documents to other formats and vice versa.
Detecting if a page is black and white
A simple check to determine if a page is pure black and white ("monochrome"). Non-monochrome means that the page has multiple gray levels or colors.
This can be done by using the Page.get_pixmap() method to get a pixmap of the page and then checking the is_monochrome attribute of the pixmap. We need to ensure that there is no anti-aliasing applied to the pixmap, so we set the anti-aliasing level to 0 using Tools.set_aa_level().
The following example demonstrates how to do this for each page in a PDF document:
import pymupdf

pymupdf.TOOLS.set_aa_level(0) # prevent anti-aliasing

def analyze_pdf(path):

    results = []

    with pymupdf.open(path) as doc:
        for i, page in enumerate(doc):
            pix=page.get_pixmap(colorspace=pymupdf.csGRAY)
            bw = pix.is_monochrome

            results.append(bw)
            label = "black & white" if bw==1 else "has color"
            print(f"Page {i + 1}/{len(doc)}: {label}")

    return results

if __name__ == "__main__":
    import sys

    if len(sys.argv) < 2:
        print("Usage: python detect_bw_pages.py <file.pdf>")
        sys.exit(1)

    pdf_path = sys.argv[1]
    analyze_pdf(pdf_path)