注釈
注釈の追加と変更方法
PyMuPDFでは、新しい注釈を Page (ページ) メソッドを介して追加することができます。一度注釈が存在すると、 Annot (注釈) クラスのメソッドを使用して大幅に変更できます。
注釈は PDF ページにのみ 挿入可能です。他のドキュメント形式では、注釈の挿入はサポートされていません。
他の多くのツールとは異なり、注釈の初期挿入は最小限のプロパティで行われます。例えば、著者、作成日、サブジェクトなどの属性をプログラマーが設定することができます。
これらの機能の概要については、次のスクリプトを参照してください。このスクリプトはPDFページに利用可能な注釈のほとんどを埋めるものです。より特殊な状況については、次のセクションをご覧ください。
# -*- coding: utf-8 -*-
"""
-------------------------------------------------------------------------------
Demo script showing how annotations can be added to a PDF using PyMuPDF.

It contains the following annotation types:
Caret, Text, FreeText, text markers (underline, strike-out, highlight,
squiggle), Circle, Square, Line, PolyLine, Polygon, FileAttachment, Stamp
and Redaction.
There is some effort to vary appearances by adding colors, line ends,
opacity, rotation, dashed lines, etc.

Dependencies
------------
PyMuPDF v1.17.0
-------------------------------------------------------------------------------
"""
from __future__ import print_function

import gc
import sys

import pymupdf

print(pymupdf.__doc__)
if pymupdf.VersionBind.split(".") < ["1", "17", "0"]:
    sys.exit("PyMuPDF v1.17.0+ is needed.")

gc.set_debug(gc.DEBUG_UNCOLLECTABLE)

highlight = "this text is highlighted"
underline = "this text is underlined"
strikeout = "this text is striked out"
squiggled = "this text is zigzag-underlined"
red = (1, 0, 0)
blue = (0, 0, 1)
gold = (1, 1, 0)
green = (0, 1, 0)

displ = pymupdf.Rect(0, 50, 0, 50)
r = pymupdf.Rect(72, 72, 220, 100)
t1 = u"têxt üsès Lätiñ charß,\nEUR: €, mu: µ, super scripts: ²³!"


def print_descr(annot):
    """Print a short description to the right of each annot rect."""
    annot.parent.insert_text(
        annot.rect.br + (10, -5), f"{annot.type[1]} annotation", color=red)


doc = pymupdf.open()
page = doc.new_page()

page.set_rotation(0)

annot = page.add_caret_annot(r.tl)
print_descr(annot)

r = r + displ
annot = page.add_freetext_annot(
    r,
    t1,
    fontsize=10,
    rotate=90,
    text_color=blue,
    fill_color=gold,
    align=pymupdf.TEXT_ALIGN_CENTER,
)
annot.set_border(width=0.3, dashes=[2])
annot.update(text_color=blue, fill_color=gold)
print_descr(annot)

r = annot.rect + displ
annot = page.add_text_annot(r.tl, t1)
print_descr(annot)

# Adding text marker annotations:
# first insert a unique text, then search for it, then mark it
pos = annot.rect.tl + displ.tl
page.insert_text(
    pos,  # insertion point
    highlight,  # inserted text
    morph=(pos, pymupdf.Matrix(-5)),  # rotate around insertion point
)
rl = page.search_for(highlight, quads=True)  # need a quad b/o tilted text
annot = page.add_highlight_annot(rl[0])
print_descr(annot)

pos = annot.rect.bl  # next insertion point
page.insert_text(pos, underline, morph=(pos, pymupdf.Matrix(-10)))
rl = page.search_for(underline, quads=True)
annot = page.add_underline_annot(rl[0])
print_descr(annot)

pos = annot.rect.bl
page.insert_text(pos, strikeout, morph=(pos, pymupdf.Matrix(-15)))
rl = page.search_for(strikeout, quads=True)
annot = page.add_strikeout_annot(rl[0])
print_descr(annot)

pos = annot.rect.bl
page.insert_text(pos, squiggled, morph=(pos, pymupdf.Matrix(-20)))
rl = page.search_for(squiggled, quads=True)
annot = page.add_squiggly_annot(rl[0])
print_descr(annot)

pos = annot.rect.bl
r = pymupdf.Rect(pos, pos.x + 75, pos.y + 35) + (0, 20, 0, 20)
annot = page.add_polyline_annot([r.bl, r.tr, r.br, r.tl])  # 'Polyline'
annot.set_border(width=0.3, dashes=[2])
annot.set_colors(stroke=blue, fill=green)
annot.set_line_ends(pymupdf.PDF_ANNOT_LE_CLOSED_ARROW, pymupdf.PDF_ANNOT_LE_R_CLOSED_ARROW)
annot.update(fill_color=(1, 1, 0))
print_descr(annot)

r += displ
annot = page.add_polygon_annot([r.bl, r.tr, r.br, r.tl])  # 'Polygon'
annot.set_border(width=0.3, dashes=[2])
annot.set_colors(stroke=blue, fill=gold)
annot.set_line_ends(pymupdf.PDF_ANNOT_LE_DIAMOND, pymupdf.PDF_ANNOT_LE_CIRCLE)
annot.update()
print_descr(annot)

r += displ
annot = page.add_line_annot(r.tr, r.bl)  # 'Line'
annot.set_border(width=0.3, dashes=[2])
annot.set_colors(stroke=blue, fill=gold)
annot.set_line_ends(pymupdf.PDF_ANNOT_LE_DIAMOND, pymupdf.PDF_ANNOT_LE_CIRCLE)
annot.update()
print_descr(annot)

r += displ
annot = page.add_rect_annot(r)  # 'Square'
annot.set_border(width=1, dashes=[1, 2])
annot.set_colors(stroke=blue, fill=gold)
annot.update(opacity=0.5)
print_descr(annot)

r += displ
annot = page.add_circle_annot(r)  # 'Circle'
annot.set_border(width=0.3, dashes=[2])
annot.set_colors(stroke=blue, fill=gold)
annot.update()
print_descr(annot)

r += displ
annot = page.add_file_annot(
    r.tl, b"just anything for testing", "testdata.txt"  # 'FileAttachment'
)
print_descr(annot)  # annot.rect

r += displ
annot = page.add_stamp_annot(r, stamp=10)  # 'Stamp'
annot.set_colors(stroke=green)
annot.update()
print_descr(annot)

r += displ + (0, 0, 50, 10)
rc = page.insert_textbox(
    r,
    "This content will be removed upon applying the redaction.",
    color=blue,
    align=pymupdf.TEXT_ALIGN_CENTER,
)
annot = page.add_redact_annot(r)
print_descr(annot)

doc.save(__file__.replace(".py", f"-{page.rotation:d}.pdf"), deflate=True)
このスクリプトは次のような出力を生成します:

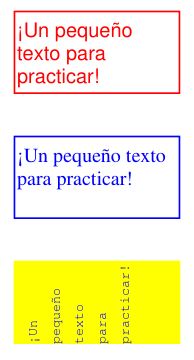
FreeTextの使用方法
このスクリプトは、'FreeText'注釈を扱ういくつかの方法を示しています:
# -*- coding: utf-8 -*-
import pymupdf

# some colors
blue = (0, 0, 1)
green = (0, 1, 0)
red = (1, 0, 0)
gold = (1, 1, 0)

# a new PDF with 1 page
doc = pymupdf.open()
page = doc.new_page()

# 3 rectangles, same size, above each other
r1 = pymupdf.Rect(100, 100, 200, 150)
r2 = r1 + (0, 75, 0, 75)
r3 = r2 + (0, 75, 0, 75)

# the text, Latin alphabet
t = "¡Un pequeño texto para practicar!"

# add 3 annots, modify the last one somewhat
a1 = page.add_freetext_annot(r1, t, text_color=red)
a2 = page.add_freetext_annot(r2, t, fontname="Ti", text_color=blue)
a3 = page.add_freetext_annot(r3, t, fontname="Co", text_color=blue, rotate=90)
a3.set_border(width=0)
a3.update(fontsize=8, fill_color=gold)

# save the PDF
doc.save("a-freetext.pdf")
結果は次のようになります。
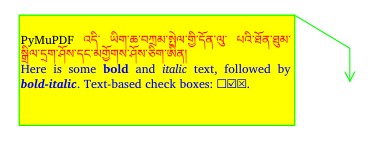
Here is an example for using rich text and call-out lines:
import pymupdf

"""Use rich text for FreeText annotations"""

# define an overall styling
ds = """font-size: 11pt; font-family: sans-serif;"""

# some special characters
bullet = chr(0x2610) + chr(0x2611) + chr(0x2612)

# the annotation text with HTML and styling syntax
text = f"""<p style="text-align:justify;margin-top:-25px;">
PyMuPDF <span style="color: red;">འདི་ ཡིག་ཆ་བཀྲམ་སྤེལ་གྱི་དོན་ལུ་ པའི་ཐོན་ཐུམ་སྒྲིལ་དྲག་ཤོས་དང་མགྱོགས་ཤོས་ཅིག་ཨིན།</span>
<span style="color:blue;">Here is some <b>bold</b> and <i>italic</i> text, followed by <b><i>bold-italic</i></b>. Text-based check boxes: {bullet}.</span>
 </p>"""

# here are some colors
gold = (1, 1, 0)
green = (0, 1, 0)

# new/empty PDF
doc = pymupdf.open()

# make a page in ISO-A4 format
page = doc.new_page()

# text goes into this:
rect = pymupdf.Rect(100, 100, 350, 200)

# define some points for callout lines
p2 = rect.tr + (50, 30)
p3 = p2 + (0, 30)

# define the annotation
annot = page.add_freetext_annot(
    rect,
    text,
    fill_color=gold,  # fill color
    opacity=1,  # non-transparent
    rotate=0,  # no rotation
    border_width=1,  # border and callout line width
    dashes=None,  # no dashing
    richtext=True,  # this is rich text
    style=ds,  # my styling default
    callout=(p3, p2, rect.tr),  # define end, knee, start points
    line_end=pymupdf.PDF_ANNOT_LE_OPEN_ARROW,  # symbol shown at p3
    border_color=green,
)

doc.save(__file__.replace(".py", ".pdf"), pretty=True)
結果は次のようになります。
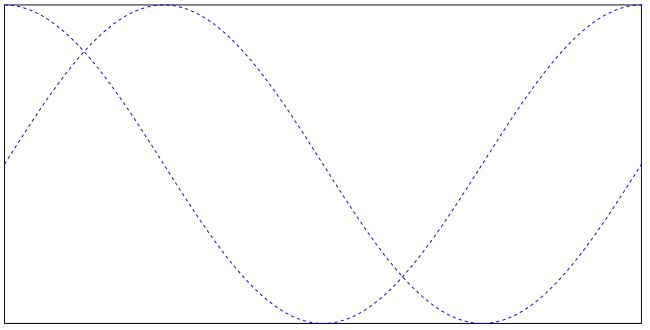
インク注釈の使用方法
インク注釈は、自由な手書きの落書きを含むために使用されます。典型的な例として、名前と姓からなる署名の画像が挙げられます。技術的には、インク注釈は点のリストのリストとして実装されます。各点のリストは、点を結んだ連続的な線と見なされます。異なる点のリストは、注釈の独立した線セグメントを表します。
The following script creates an ink annotation with two mathematical curves (sine and cosine function graphs) as line segments:
import math
import pymupdf

#------------------------------------------------------------------------------
# preliminary stuff: create function value lists for sine and cosine
#------------------------------------------------------------------------------
w360 = math.pi * 2  # go through full circle
deg = w360 / 360  # 1 degree as radians
rect = pymupdf.Rect(100,200, 300, 300)  # use this rectangle
first_x = rect.x0  # x starts from left
first_y = rect.y0 + rect.height / 2.  # rect middle means y = 0
x_step = rect.width / 360  # rect width means 360 degrees
y_scale = rect.height / 2.  # rect height means 2
sin_points = []  # sine values go here
cos_points = []  # cosine values go here
for x in range(362):  # now fill in the values
    x_coord = x * x_step + first_x  # current x coordinate
    y = -math.sin(x * deg)  # sine
    p = (x_coord, y * y_scale + first_y)  # corresponding point
    sin_points.append(p)  # append
    y = -math.cos(x * deg)  # cosine
    p = (x_coord, y * y_scale + first_y)  # corresponding point
    cos_points.append(p)  # append

#------------------------------------------------------------------------------
# create the document with one page
#------------------------------------------------------------------------------
doc = pymupdf.open()  # make new PDF
page = doc.new_page()  # give it a page

#------------------------------------------------------------------------------
# add the Ink annotation, consisting of 2 curve segments
#------------------------------------------------------------------------------
annot = page.add_ink_annot((sin_points, cos_points))
# let it look a little nicer
annot.set_border(width=0.3, dashes=[1,])  # line thickness, some dashing
annot.set_colors(stroke=(0,0,1))  # make the lines blue
annot.update()  # update the appearance

page.draw_rect(rect, width=0.3)  # only to demonstrate we did OK

doc.save("a-inktest.pdf")
これが結果です: