付録3:さまざまな技術情報
このセクションでは、必ずしも関連しないさまざまな技術的なトピックについて取り扱います。
画像変換行列
バージョン1.18.11から、テキストと画像の抽出に関する一部のメソッドで画像変換行列が返されます:Page.get_text() および Page.get_image_bbox() 。
変換行列には、画像が文書ページ上の矩形(「境界ボックス」=「bbox」)に適合するためにどのように変換されたかに関する情報が含まれています。ページ上の画像のbboxとこの行列を検査することにより、例えば画像がページ上で拡大縮小または回転して表示されるかどうか、そしてどのように表示されるかを判断することができます。
画像の寸法とページ上のbboxとの関係は次のとおりです:
- 元の画像の幅と高さを使用して、
画像の矩形を
imgrect = pymupdf.Rect(0, 0, width, height)と定義します。「縮小行列」を
shrink = pymupdf.Matrix(1/width, 0, 0,1/height, 0, 0)と定義します。
画像矩形を縮小行列で変換すると、単位矩形が得られます:
imgrect * shrink = pymupdf.Rect(0, 0, 1, 1)。画像 変換行列 「transform」を使用して、次の手順でbboxを計算します:
imgrect = pymupdf.Rect(0, 0, width, height)
shrink = pymupdf.Matrix(1/width, 0, 0, 1/height, 0, 0)
bbox = imgrect * shrink * transform
行列の積
shrink * transformを検査することで、画像矩形がページ上のbboxに適合させるために何が起こったかに関するすべての情報が明らかになります。回転、辺のスケーリング、および原点の移動です。例を見てみましょう:>>> imginfo = page.get_images()[0] # get an image item on a page >>> imginfo (5, 0, 439, 501, 8, 'DeviceRGB', '', 'fzImg0', 'DCTDecode') >>> #------------------------------------------------ >>> # define image shrink matrix and rectangle >>> #------------------------------------------------ >>> shrink = pymupdf.Matrix(1 / 439, 0, 0, 1 / 501, 0, 0) >>> imgrect = pymupdf.Rect(0, 0, 439, 501) >>> #------------------------------------------------ >>> # determine image bbox and transformation matrix: >>> #------------------------------------------------ >>> bbox, transform = page.get_image_bbox("fzImg0", transform=True) >>> #------------------------------------------------ >>> # confirm equality - permitting rounding errors >>> #------------------------------------------------ >>> bbox Rect(100.0, 112.37525939941406, 300.0, 287.624755859375) >>> imgrect * shrink * transform Rect(100.0, 112.375244140625, 300.0, 287.6247253417969) >>> #------------------------------------------------ >>> shrink * transform Matrix(0.0, -0.39920157194137573, 0.3992016017436981, 0.0, 100.0, 287.6247253417969) >>> #------------------------------------------------ >>> # the above shows: >>> # image sides are scaled by same factor ~0.4, >>> # and the image is rotated by 90 degrees clockwise >>> # compare this with pymupdf.Matrix(-90) * 0.4 >>> #------------------------------------------------
PDFベース14フォント
以下の14の組み込みフォント名は、すべてのPDFビューアアプリケーションでサポートされる必要があります 。これらは辞書として利用可能で、それぞれのフルネームとその略称を小文字で完全な フォントベース名 にマッピングします。PyMuPDFでフォント名を提供する必要がある場合、辞書からの任意の キーまたは値 を使用できます:
In [2]: pymupdf.Base14_fontdict
Out[2]:
{'courier': 'Courier',
'courier-oblique': 'Courier-Oblique',
'courier-bold': 'Courier-Bold',
'courier-boldoblique': 'Courier-BoldOblique',
'helvetica': 'Helvetica',
'helvetica-oblique': 'Helvetica-Oblique',
'helvetica-bold': 'Helvetica-Bold',
'helvetica-boldoblique': 'Helvetica-BoldOblique',
'times-roman': 'Times-Roman',
'times-italic': 'Times-Italic',
'times-bold': 'Times-Bold',
'times-bolditalic': 'Times-BoldItalic',
'symbol': 'Symbol',
'zapfdingbats': 'ZapfDingbats',
'helv': 'Helvetica',
'heit': 'Helvetica-Oblique',
'hebo': 'Helvetica-Bold',
'hebi': 'Helvetica-BoldOblique',
'cour': 'Courier',
'coit': 'Courier-Oblique',
'cobo': 'Courier-Bold',
'cobi': 'Courier-BoldOblique',
'tiro': 'Times-Roman',
'tibo': 'Times-Bold',
'tiit': 'Times-Italic',
'tibi': 'Times-BoldItalic',
'symb': 'Symbol',
'zadb': 'ZapfDingbats'}
義務とは対照的に、すべてのPDFビューアがこれらのフォントを正確かつ完全にサポートしているわけではありません。特にSymbolとZapfDingbatsについては、これが特に当てはまります。また、グリフ(視覚的な)イメージは、それぞれの閲覧者に固有のものになります。
これらのフォントがどのように使用されるか( CJK組み込みフォント も含めて)、Page.insert_font() のテーブルをご覧ください。
Adobe PDFリファレンス
Adobeによって公開されたこのPDFリファレンスマニュアルは、このドキュメンテーション全体で頻繁に引用されています。 こちら から閲覧およびダウンロードが可能です。
PythonシーケンスをPyMuPDFで引数として使用する場合
PyMuPDFのオブジェクトとメソッドが数値の値のPython リスト を必要とする場合、他のPython シーケンス型 も許可されています。Pythonのクラスは、__getitem__() メソッドを持つ場合、シーケンスプロトコル を実装していると言われています。
基本的には、これらの場合にPythonの リスト や タプル 、array.array 、numpy.array 、bytearray 型を互換性を持って使用できることを意味しています。
例えば、次のいずれかの方法でシーケンス "s" を指定すると
s = [1, 2]– リストs = (1, 2)– タプルs = array.array("i", (1, 2))– array.arrays = numpy.array((1, 2))– numpy配列s = bytearray((1, 2))– bytearray
これによって、以下の例の式で使用可能になります:
pymupdf.Point(s)pymupdf.Point(x, y) + sdoc.select(s)
同様に、すべてのジオメトリオブジェクト Rect (矩形) 、IRect 、Matrix (マトリックス) 、 Point (ポイント) も同様です。
なぜなら、すべてのPyMuPDFジオメトリクラス自体がシーケンスの特殊なケースであるため、( Quad (クアッド) を除く)数値のシーケンスが使用可能な場所で自由に使用できるからです。例えば、 list() 、 tuple() 、 array.array()
>>> import pymupdf, array, numpy as np
>>> m = pymupdf.Matrix(1, 2, 3, 4, 5, 6)
>>>
>>> list(m)
[1.0, 2.0, 3.0, 4.0, 5.0, 6.0]
>>>
>>> tuple(m)
(1.0, 2.0, 3.0, 4.0, 5.0, 6.0)
>>>
>>> array.array("f", m)
array('f', [1.0, 2.0, 3.0, 4.0, 5.0, 6.0])
>>>
>>> np.array(m)
array([1., 2., 3., 4., 5., 6.])
注釈
Quad (クアッド) もPythonのシーケンスオブジェクトであり、長さが4です。ただし、そのアイテムは数値ではなく point_like です。したがって、上記の注釈は適用されません。
重要なオブジェクトの整合性を確保するためのPyMuPDF
PyMuPDFは、CライブラリMuPDFのPythonバインディングです。MuPDFの開発者たちは、ある種のオブジェクト指向の振る舞いを模倣するために多くの努力をしてきましたが、C言語の基本的な制約を克服することはできませんでした。
一方で、Pythonは非常にクリーンな方法でOOモデルを実装しています。PyMuPDFとMuPDFの間のインターフェースコードは、基本的に2つのファイルから構成されています: pymupdf.py と fitz_wrap.c 。これらは、新バージョンごとに優れたSWIGツールによって作成されます。
PyMuPDFのオブジェクトやメソッドのいずれかを使用すると、これにより pymupdf.py でいくつかのコードが実行され、それがさらに fitz_wrap.c でコンパイルされたCコードを呼び出します。
SWIGはPythonとCレベルを同期させるために大いに役立っているため、一定のルールが厳密に守られる限り、すべてが正常に動作します。例えば、所有している ドキュメント を閉じたり(または削除したり、Noneに設定したり)した後に Page (ページ) オブジェクトに アクセスしないでください 。また、より明確な例では、 select() 、delete_page() 、 insert_page() などのドキュメントメソッドを実行した後にページやその子要素(リンクや注釈など)に アクセスしないでください 。
ただし、無効なオブジェクトへのアクセスをやめるだけでは実際には十分ではありません。これらのオブジェクトは、Cレベルのリソース(割り当てられたメモリ)も解放するために、完全に削除されるべきです。
これらのルールの理由は、ドキュメントとそのページ、およびページとそのリンク/注釈の間に階層的な2段階の1対多の関係があるためです。一貫した状況を維持するために、上記のアクションのいずれもが PythonとCの両方で 完全なリセットを引き起こさなければなりません。
SWIGはこれを知ることはできないため、それを実行しません。
必要な論理はしたがって、PyMuPDF自体に以下のように組み込まれています。
ページが所有するドキュメントを失ったり、それ自体が削除されると、現在存在するすべての注釈とリンクはPythonで使用できなくなり、それらのCレベルの対応部分が削除されて解放されます。
ドキュメントが閉じられたり(または削除されたり、
Noneに設定されたり)したり、構造が変更されたりすると、同様に現在存在するすべてのページとその子要素は使用できなくなり、対応するCレベルの削除が行われます。「構造の変更」とは、 select() 、 delete_page() 、 insert_page() 、 insert_pdf() などのメソッドを含みます。これらのすべてはオブジェクトの削除の連鎖を引き起こします。
プログラマーは通常、これらのいずれも気づかないでしょう。ただし、無効なオブジェクトにアクセスしようとすると、例外が発生します。
無効なオブジェクトは、 del page または page = None などのPythonステートメントで直接削除することはできません。代わりに、その __del__ メソッドを呼び出す必要があります。
すべてのページ、リンク、注釈には、所有するオブジェクトを指す 親 プロパティがあります。これはアプリケーションレベルでチェックできるプロパティです: obj.parent == None ならば、そのオブジェクトの親は存在せず、そのプロパティやメソッドへの参照は例外を発生させてこの「孤立」した状態について通知します。
サンプルセッション:
>>> page = doc[n]
>>> annot = page.first_annot
>>> annot.type                    # everything works fine
[5, 'Circle']
>>> page = None                   # this turns 'annot' into an orphan
>>> annot.type
<... omitted lines ...>
RuntimeError: orphaned object: parent is None
>>>
>>> # same happens, if you do this:
>>> annot = doc[n].first_annot     # deletes the page again immediately!
>>> annot.type                    # so, 'annot' is 'born' orphaned
<... omitted lines ...>
RuntimeError: orphaned object: parent is None
これは連鎖効果を示しています。
>>> doc = pymupdf.open("some.pdf")
>>> page = doc[n]
>>> annot = page.first_annot
>>> page.rect
pymupdf.Rect(0.0, 0.0, 595.0, 842.0)
>>> annot.type
[5, 'Circle']
>>> del doc                       # or doc = None or doc.close()
>>> page.rect
<... omitted lines ...>
RuntimeError: orphaned object: parent is None
>>> annot.type
<... omitted lines ...>
RuntimeError: orphaned object: parent is None
注釈
上記の関係外のオブジェクトは、このメカニズムに含まれていません。たとえば、 toc = doc.get_toc() のように目次を作成し、後で文書を閉じたり変更したりする場合、これは変数 toc をどのようにも変更しません。必要に応じてそのような変数を更新する責任はあなたにあります。
メソッド Page.show_pdf_page() の設計
目的と機能
このメソッドは、現在の(「含まれる」、「ターゲット」)ページの指定された矩形内に別のPDF文書の(「ソース」)ページの画像を表示します。
Page.insert_image()とは異なり 、この表示はベクターベースであり、ズームレベルを超えて正確に保たれます。Page.insert_image()と同様に 、表示のサイズは指定された矩形に調整されます。
現在、次のバリエーションの表示がサポートされています:
- Bool パラメーター
"keep_proportion"はアスペクト比を保持するかどうかを制御します(デフォルト)。 矩形パラメーター
"clip"はソースページの矩形の可視部分を制限します。デフォルトはフルページです。
- Bool パラメーター
float
"rotation"は表示を任意の角度(度)で回転させます。角度が90の倍数でない場合、"keep_proportion"も true の場合、ターゲットの境界に4つのうち2つのコーナーのみが配置される場合があります。Bool パラメーター
"overlay"は、画像を現在のページコンテンツの上(前景、デフォルト)に配置するか、そうでないか(背景)を制御します。
使用例は以下のようなものがありますが、これに限定されません:
現在の文書の複数のページに同じ画像(企業のロゴや透かし)を「スタンプ」する。
任意の入力ページを1つの出力ページに組み合わせ、"ブックレット"や両面印刷をサポートする(「4-up」、「n-up」としても知られています)。
(大きな)入力ページをいくつかの任意のピースに分割する。これは「ポスタリゼーション」とも呼ばれ、たとえばA4ページを水平および垂直に分割し、4つのピースを別々のA4ページに拡大印刷して、元のページのA2バージョンを作成することができます。
テクニカル実装
これはPDF 「フォームXObject」 を使用して行われます。 Adobe PDFリファレンス リファレンス の217ページ、セクション8.10を参照してください。 Page.show_pdf_page() が実行されると、次のことが起こります。
ソースドキュメント内のソースページの
resourcesとcontentsオブジェクトは、ターゲットドキュメントにコピーされ、共同で新しい フォームXObject が作成されます。このオブジェクトのPDFxref番号がメソッドによって返されます。
/BBoxはソースページの/Mediaboxに等しいです。
/Matrixは単位行列と等しいです。
/Resourcesはソースページのものに等しいです。これには、階層的にネストされた他のオブジェクト(フォント、画像など)の「ディープコピー」が含まれます。ここでの複雑さは、MuPDFのグラフティング[1]技術関数によってカバーされています。これはストリームオブジェクトタイプであり、そのストリームはソースページの
contentsオブジェクトの結合データの正確なコピーです。このフォームXObjectは、表示されるソースページごとに1回だけ実行されます。同じソースページの後続の表示では、このステップはスキップされ、このオブジェクトへの「ポインター」フォームXObject(次のステップで行われる)のみが作成されます。
次に、ターゲットページが表示を呼び出すために使用する2番目の フォームXObject が作成されます。このオブジェクトには次のような特性があります。
/BBoxはソースページの/CropBox`(または `"クリップ")に等しいです。
/Matrixは/BBoxからターゲット矩形へのマッピングを表します。
/XObjectは、以前のフォームXObjectを固定された名前fullpageを介して参照します。このオブジェクトのストリームには、正確に1つの固定されたステートメントが含まれています:
/fullpage Do。メソッドの
「oc」引数が指定された場合、その値はこのフォームXObjectに/OCとして割り当てられます。ターゲットページの
リソースとコンテンツオブジェクトは以下のように変更されます。
/Resourcesの/XObject辞書に、 ` fzFrm ` という名前のエントリをページ内で一意であるように追加します(nはこのエントリがページで一意であるように選択されます)。
"overlay"に応じて、ページの/ Contents配列に新しいオブジェクトを前または後に追加し、ステートメントq / fzFrm<n> Do Qを含めます。
この設計アプローチは次を保証します:
(潜在的に大きな)ソースページは、ターゲットPDFに1度だけコピーされます。各ターゲットページごとに、ソースページを表示するための小さな「ポインター」フォームXObjectオブジェクトが作成されます。
参照する各ターゲットページは、ソースページの表示を個別に制御するための独自の
「oc」パラメータを持つことができます。
Diagnostics
PyMuPDF messages
PyMuPDF has a Message system for showing text diagnostics.
By default messages are written to sys.stdout. This can be controlled in
two ways:
Set environment variable
PYMUPDF_MESSAGEbefore PyMuPDF is imported.Call
set_messages():
MuPDF errors and warnings
MuPDF generates text errors and warnings.
These errors and warnings are appended to an internal list, accessible with
Tools.mupdf_warnings(). Also seeTools.reset_mupdf_warnings().By default these errors and warnings are also sent to the PyMuPDF message system.
This can be controlled with
mupdf_display_errors()andmupdf_display_warnings().These messages are prefixed with
MuPDF error:andMuPDF warning:respectively.
Some MuPDF errors may lead to Python exceptions.
Example output for a recoverable error. We are opening a damaged PDF, but MuPDF is able to repair it and gives us a little information on what happened. Then we illustrate how to find out whether the document can later be saved incrementally. Checking the Document.is_dirty attribute at this point also indicates that during pymupdf.open the document had to be repaired:
>>> import pymupdf
>>> doc = pymupdf.open("damaged-file.pdf")  # leads to a sys.stderr message:
mupdf: cannot find startxref
>>> print(pymupdf.TOOLS.mupdf_warnings())  # check if there is more info:
cannot find startxref
trying to repair broken xref
repairing PDF document
object missing 'endobj' token
>>> doc.can_save_incrementally()  # this is to be expected:
False
>>> # the following indicates whether there are updates so far
>>> # this is the case because of the repair actions:
>>> doc.is_dirty
True
>>> # the document has nevertheless been created:
>>> doc
pymupdf.Document('damaged-file.pdf')
>>> # we now know that any save must occur to a new file
Example output for an unrecoverable error:
>>> import pymupdf
>>> doc = pymupdf.open("does-not-exist.pdf")
mupdf: cannot open does-not-exist.pdf: No such file or directory
Traceback (most recent call last):
  File "<pyshell#1>", line 1, in <module>
    doc = pymupdf.open("does-not-exist.pdf")
  File "C:\Users\Jorj\AppData\Local\Programs\Python\Python37\lib\site-packages\fitz\pymupdf.py", line 2200, in __init__
    _pymupdf.Document_swiginit(self, _pymupdf.new_Document(filename, stream, filetype, rect, width, height, fontsize))
RuntimeError: cannot open does-not-exist.pdf: No such file or directory
>>>
脚注
This is one of the most frequently used terms in this documentation. A coordinate generally means a pair of numbers (x, y) referring to some location, like a corner of a rectangle (Rect (矩形)), a Point (ポイント) and so forth. The two values usually are floats, but there a objects like images which only allow them to be integers.
To actually find a coordinate's location, we also need to know the reference point for x and y - in other words, we must know where location (0, 0) is positioned. Once (0, 0) (the "origin") is known, we speak of a "coordinate system".
Several coordinate systems exist in document processing. For instance, the coordinate systems of a PDF page and the image created from it are different. We therefore need ways to transform coordinates from one system to another (and also back occasionally). This is the task of a Matrix (マトリックス). It is a mathematical function which works much like a factor that can be "multiplied" with a point or rectangle to give us the corresponding point / rectangle in another coordinate system. The inverse of a transformation matrix can be used to revert the transformation. Much like multiplying by some factor, say 3, can be reverted by dividing the result by 3 (or multiplying it with 1/3).
Coordinates and Images
Images have a coordinate system with integer coordinates. Origin (0, 0) is the top-left point. x values must be in range(width), and y values in range(height). Therefore, y values increase if we go downwards. For every image, there is only a finite number of coordinates, namely width * height. A location in an image is also called a "pixel".
How large an image will be (in centimeters or inches) when e.g. printed, depends on additional information: the "resolution". This is measured in DPI (dots per inch, or pixels per inch). To find the printed size of some image, we therefore must divide its width and its height by the corresponding DPI values (there may separate ones for width and for height) and will get the respective number of inches.
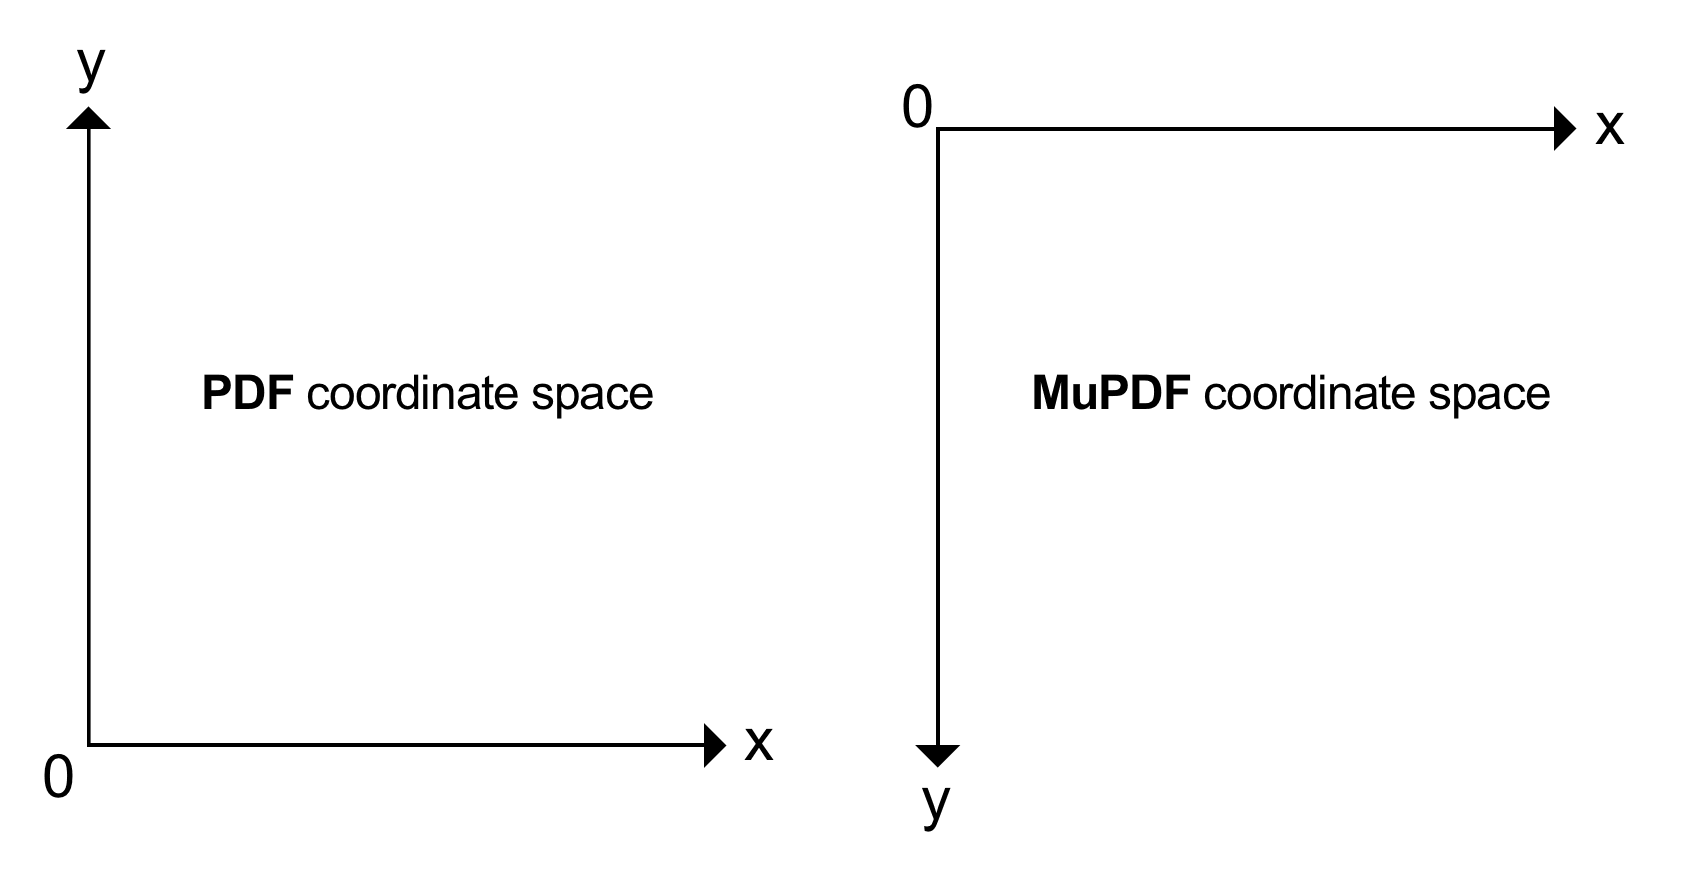
Origin Point, Point Size and Y-Axis
In PDF, the origin (0, 0) of a page is located at its bottom-left point. In MuPDF, the origin (0, 0) of a page is located at its top-left point.
Coordinates are float numbers and measured in points, where:
one point equals 1/72 inches.
Typical document page sizes are ISO A4 and Letter. A Letter page has a size of 8.5 x 11 inches, corresponding to 612 x 792 points. In the PDF coordinate system, the top-left point of a Letter page hence has the coordinate (0, 792) as the y-axis points upwards. Now we know our document size the MuPDF coordinate system for the bottom right would be coordinate (612, 792) (and for PDF this coordinate would then be (612,0)).
Theoretically, there are infinitely many coordinate positions on a PDF page. In practice however, at most the first 5 decimal places are sufficient for a reasonable precision.
In MuPDF, multiple document formats are supported - PDF just being one among over a dozen others. Images are also supported as documents in MuPDF (therefore having one page usually). This is one of the reasons why MuPDF uses a coordinate system with the origin
(0, 0)being the top-left point of any document page. The y-axis points downwards, like with images. Coordinates in MuPDF in any case are floats, like in PDF.A rectangle
Rect(0, 0, 100, 100)for instance in MuPDF (and thus PyMuPDF) therefore is a square with edges of length 100 points (= 1.39 inches or 3.53 centimeters). Its top-left corner is the origin. To switch between the two coordinate systems PDF to MuPDF, every Page (ページ) object has aPage.transformation_matrix. Its inverse can be used to compute a rectangle's PDF coordinates. In this way we can conveniently find thatRect(0, 0, 100, 100)in MuPDF is the same asRect(0, 692, 100, 792)in PDF. See this code snippet:>>> page = doc.new_page(width=612, height=792) # make new Letter page >>> ptm = page.transformation_matrix >>> # the inverse matrix of ptm is ~ptm >>> pymupdf.Rect(0, 0, 100, 100) * ~ptm Rect(0.0, 692.0, 100.0, 792.0)
CSS Support
For now, only a subset of CSS properties are supported.
The underlying C library MuPDF supports a subset of HTML4 and CSS2. The primary goal of the HTML/CSS support is to serve as a popular and convenient way to style text — not to faithfully reproduce websites in PDF.
What Works
The following list shows the supported properties, grouped by category.
Box Model & Layout
margin, margin-top, margin-right, margin-bottom, margin-left, padding, padding-top, padding-right, padding-bottom, padding-left, width, height, display, position, top, right, bottom, left, inset, overflow-wrap, columns
注釈
The properties position & display are supported in a very limited way. Only the values position: relative and display: block are supported.
Border
border, border-top, border-right, border-bottom, border-left, border-color, border-style, border-width, border-spacing, border-collapse, border-top-color, border-right-color, border-bottom-color, border-left-color, border-top-style, border-right-style, border-bottom-style, border-left-style, border-top-width, border-right-width, border-bottom-width, border-left-width
Background
background, background-color
注釈
Background images are not supported, but the background property can be used to set a background color for a text block, which is then rendered as a filled rectangle behind the text.
Font
font, font-family, font-size, font-style, font-variant, font-weight
Text
color, letter-spacing, line-height, text-align, text-decoration, text-indent, text-transform, word-spacing, white-space, vertical-align, direction, hyphens
List
list-style, list-style-image, list-style-position, list-style-type
Page
page-break-before, page-break-after, orphans, widows
Visibility
visibility
MuPDF-specific / WebKit extensions
-mupdf-leading, -webkit-text-fill-color, -webkit-text-stroke-color, -webkit-text-stroke-width
Other
src (for @font-face), overflow-wrap
What Doesn't Work
Modern CSS (CSS3+): no flexbox, grid, custom properties (--vars), calc(), transitions, animations, float, clear.
脚注